Good Morning Sweet Friends!!! It's another day in a weekend full of Prickley Pear Rubber Stamp goodness!! Today's feature is the January Sketch Challenge! Here's the sketch:
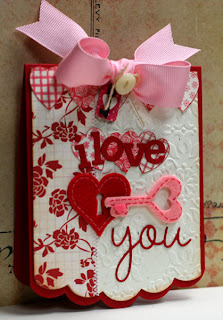
and here's my take on the sketch:
I used my January CupCards {to go} Valentine's Kit which is absolutely fabulous and so fun to work with!! Head on over to the CupCards {to go} website and comment on all the sneak posts for your chance to win!! The kit reveal is scheduled for Monday night!!! I know you're going to love it!!
Instructions:
1. Die cut edges of card base and card layers.
2. Dry emboss cardstock layer. Ink all edges.
3. Layers patterned paper and cardstock onto card base and stitch seam. (I used the stitching rub ons in the CupCards {to go} kit.)
4. Stamp hearts and fussy cut. Make a heart border for the top of the card. Make a mat of hearts for the sentiment.
5. Die cut sentiment and embellish the front of the card with assorted goodies and a ribbon bow.
Supplies Used:
Prickley Pear Rubber Stamps Heart Key Crown Clear Stamp set
January CupCards {to go} Valentine's Kit
Papertrey Ink Rustic Cream Cardstock
Papertrey Ink Dies: Edgers #4, Block Alphabet, Wonderful Words
Papertrey Ink Ribbon: Sweet Blush and Button Twine
Stampin Up! Vintage Wall Paper Embossing Folder
I had a blast making this card! The Prickley Pear hearts are so fun to play and you can be sure I will be using them again!! I hope you will join us in the January Sketch Challenge!! Here's the scoop:
Stay tuned for more Prickley Pear and CupCards {to go} goodness tomorrow!!!
Hope you have an absolutely fabulous day,
Kristii
I used the Heart Key Crown Clear Stamp set for today's project:
I used my January CupCards {to go} Valentine's Kit which is absolutely fabulous and so fun to work with!! Head on over to the CupCards {to go} website and comment on all the sneak posts for your chance to win!! The kit reveal is scheduled for Monday night!!! I know you're going to love it!!
Instructions:
1. Die cut edges of card base and card layers.
2. Dry emboss cardstock layer. Ink all edges.
3. Layers patterned paper and cardstock onto card base and stitch seam. (I used the stitching rub ons in the CupCards {to go} kit.)
4. Stamp hearts and fussy cut. Make a heart border for the top of the card. Make a mat of hearts for the sentiment.
5. Die cut sentiment and embellish the front of the card with assorted goodies and a ribbon bow.
Supplies Used:
Prickley Pear Rubber Stamps Heart Key Crown Clear Stamp set
January CupCards {to go} Valentine's Kit
Papertrey Ink Rustic Cream Cardstock
Papertrey Ink Dies: Edgers #4, Block Alphabet, Wonderful Words
Papertrey Ink Ribbon: Sweet Blush and Button Twine
Stampin Up! Vintage Wall Paper Embossing Folder
I had a blast making this card! The Prickley Pear hearts are so fun to play and you can be sure I will be using them again!! I hope you will join us in the January Sketch Challenge!! Here's the scoop:
- Make a card using the sketch above.
- Everybody is welcome to participate, no PPRS products needed.
- Link your blog post with your card by January 31st.
- One winner will be drawn randomly and will receive a $15 gift certificate at the Prickley Pear Web Shop!
- Winner will be announced February 1.
Stay tuned for more Prickley Pear and CupCards {to go} goodness tomorrow!!!
Hope you have an absolutely fabulous day,
Kristii


I am SO completely smitten with your card, Kristii! It is absolutely stunning!
ReplyDeleteOh woooowowowwowow! :) What a fantastic card. I love absolutly EVERYTHING about it. Gorgeous scalloped edge and the idea of matting the sentiment on the hearst - gorgeous!!!!!
ReplyDeleteKristii, this is so gorgeous. Your details are amazing.
ReplyDeleteThis is beautiful, Kristii! I love all those hearts as a border and a mat, and the key and heart lock in felt are so sweet. ~Hugs, Cheryl
ReplyDeleteWhat a sweet gorgeous Valentine card! Love the heart, key, and scalloped edge!
ReplyDeleteSuch a sweet card! :)
ReplyDelete