Tuesday, December 2, 2014

12 Days of Christmas - Day One - Party Invitations

Good Morning Dear friends and Happy December!! It's my favorite time of the year and that means it's time to share my version of The Twelve Days of Christmas with you once again!   Today's project is a fast and cute little party invitation.  My invitation is for a baby shower, but you can use this idea for any type of party you may have during the holidays.  I really got out of my box with this baby shower invitation, but why not, it's the holidays and anything goes!!

Instructions:
1.  Cut a card base.  I used Papertrey Ink's Card Base-ics #1 die and Pure Poppy Cardstock.  This die is my favorite for invitations!!
2.  Design your invitation.  I used the popular chalkboard background for this invitation.  I think it will be a lot of fun to carry on the chalkboard theme into the party decorations as well.
Click onto the image and save to your computer.  Embellish and print as desired.  The fonts I used for this card were Branboll, Connie and WW Flakes which were all downloaded free of charge from DaFont.
3. Trim your printed panel and layer it onto a slightly larger white cardstock panel and then onto a printed cardstock panel.  I just love the diagonal stripes used on this invitation.
4.  Embellish as desired.  I added a pretty little snowflake, arrow and red jewel.

Such a quick and easy way to invite your guests.  I challenge you to get out of your box and create something different and fun for the holidays!!

Thank you for joining me once again for The Twelve Days of Chistmas!!
Have a wonderful day,
Kristii

Sunday, November 2, 2014

Make It Monday #186: Partial Die Stamping

Hi everyone!! I'm back!!  Whooo hooo!! I can't even tell you how good it felt to get a little crafty this weekend!!  I wanted to make a card for a friend and this week's Papertrey Ink MIM Challenge was the perfect inspiration to get my rusty self back in gear!  I used Papertrey Ink's Autumn Adornments to get myself started.
I stamped some Stamper's Select White Cardstock with the Autumn Adornments vine stamp in Simply Chartreuse, Summer Sunrise, Orange Zest, Pure Poppy and Ripe Avocado Ink and then die cut the paper using Phrase Play #8.
I used several Papertrey Ink stamp sets in this card including Be Happy for the frame, Autumn Acorns, and Through the Trees for the sentiment.  I also used some sequins and twine from Betsy's MIM kit Luxe Letterpress.

Thank you so much for stopping by!!  I look forward to seeing what you create for the MIM Challenge!!
Kristii

Thursday, May 1, 2014

CupCards to Go May Kit

Hi friends!! I am sorry I am behind in getting the CupCards to Go May Kit posted, but life has been nothing but crazy!!  In all the craziness, however, the May kit was a joy to work with and spending some time in my craft studio was just what the doctor ordered!!

The Devoted kit is all about Mothers and I did have to make a fun little Mother's Day card.  The papers are so beautiful and I used my favorite paper from the kit in the card below:
Aren't the colors delicious?  I couldn't help but cut a few of the flowers out to use as embellishments. They are soooo pretty and check out that sweet little birdie!! Isn't he the cutest?  This month's challenge is "For the Birds" and this little card fits perfectly.  This card is also loosely based on this month's sketch.
 There are so many things you can say about a Mother's love, but ultimately, it is the heart of the home.  The stickers included in the kit worked perfectly for this card!!
The next little set of card was made using the cute little mini cards in the kit.  I die cut the cards using a little doily shape making sure the top of the card was not in the die cut area which created a sweet little shaped card.
These little shaped cards will be perfect for a bunch of flowers or for a gift bag for mom!!
 I also decorated the envelopes to make gift giving even more special!!
The cute little clip in the card inspired me to make a birthday card with the kit!  Don't you just love that sweet little clip??
 I had a "birthday die" and I cut it out several times and layered them all together to create a nice thick embellishment.  Don't you just love the texture it creates?
 I cut out some of the flowers from the patterned paper to use as an embellishment and added some die cut hearts to make the card as sweet as the birthday girl is!
 The next card is just a lot of layered fun!!  I stamped some polka dots onto my card base and layered a panel on top using some dimensional tape.  I tucked in some fussy cut elements and also a flower from the kit to add depth and visual interest.
 I added a couple of the embellishments from the kit along with one of the SRM stickers as the sentiment and tied it all off with a twine bow.
 You can see the depth that was created in the photo below:
The last card I created with this month's kit was inspired by the little bird on the branch embellishment included in the kit.  This card was quick and easy and will be so much fun to send out to a loved one or friend!
 Don't you just love the sweet little birdie?  This card also works with the monthly challenge!
Thank you so much for stopping by!!!  I hope you were able to get one of these kits for yourself!!  They are fabulous!!
Have a wonderful day!!
Kristii

Tuesday, March 25, 2014

Papertrey Ink March Blog Hop

Hi dear friends!!!  It's my favorite time of the month!!!  It's time for the Papertrey Ink March Blog Hop!!!  I just love this month's challenge and I was fortunate enough to receive a brand new package from Papertrey Ink just in time for the Blog Hop!! Whooo hoo!!  I had a blast using my new stamps!!  Here's the challenge:
The-Challenge
March-Blog-Hop-Inspiration
and here's my take on the challenge:
I just love these stamps and dies.  They will be so fun to work with any color scheme but I am completely loving the primary colors!!  So fun and folksy!!  I used clear embossing powder on the sentiment and Glossy Accents on the flowers!! Thank you PTI for such a fun challenge!!


PTI Supplies Used:
Embellished Elegance Stamps and Dies
Stamper's Select White Cardstock
Pure Poppy Patterned Paper
Pure Poppy, Harvest Gold, and New Leaf Inks
Other Supplies:  Heidi Swapp Teal Ink, Clear Embossing Powder, Glossy Accents and Memento Tuxedo Black Ink


Monday, March 24, 2014

CupCards to Go Spring KIt

Hi there dear friends!!! I am soooo excited to share the CupCards to Go Spring Kit with you!! Whooo hooo!  It's an absolutely amazing kit and I went wild in my little studio and couldn't stop creating!!  I hope you make sure to get in on this kit!! You're gonna love it too!  The first card I'm sharing with you today is my favorite!!  I just love those sweet little birds!!  The challenge this month is to make a card with a Sunshine Theme and it wasn't hard to do with this kit!
I die cut a circle in the top middle of the card and added a sunshine die cut to layer under the circle. I love the depth it created!!  I added some birdies and sentiment sticker to complete the focal point. Such an easy card and yet so effective!!
The next card also has a sunshine theme.  I just love the tag included in the kit and it totally sets the tone for the whole card.  I used one of the circular stickers to create the feel of the sun peeking out from behind the clouds.  Don't you just love those clouds?
This card is all about color and brightening up someone's day.  I love all the stickers in the kit and the little flags add just the right touch!
The next card just screams Hello Spring!!  I added some texture to the base and some stamping to add some color.  I don't know about you, but after this long cold winter, I am needing lots of color in my life!!
 I added a die cut and stamped butterfly and hello die cut to the goodies included in the kit!!  Sooo fun!
I couldn't get enough of the bright and cheery colors, so I created this card with a yellow die cut chevron base.  The yellow stripes on the side make my heart sing!!
I layered the beautiful floral sticker on top of some canvas flags that are included in the embellishment kit!! I love them!!
All of the cute little stickers and ribbons inspired me to create a series of tags to give to someone special with the stickers and papers in the kit.  I created a little envelope out of vellum and I stamped and embossed a little seed packet motif on the front.
Here's a close-up of the little seed packet embellished with a gorgeous flower from the kit.


The next card is a quick and easy card based on the sketch for this month.  The butterfly is simply spectacular, don't you think?
I used several Stickers to compliment the design and to add color!  Love those sentiment stickers!!
I used up some of my scraps to create this quick and easy card to finish out my kit!  I love using up my scraps and the sweet little layered hello banner pin was the perfect embellishment!
Each and every card was a joy to create!! I love CupCards to Go!! Sonda puts together the sweetest kits ever!!

Thanks for stopping by and I wish you a wonderful day!!
Kristii

Sunday, March 16, 2014

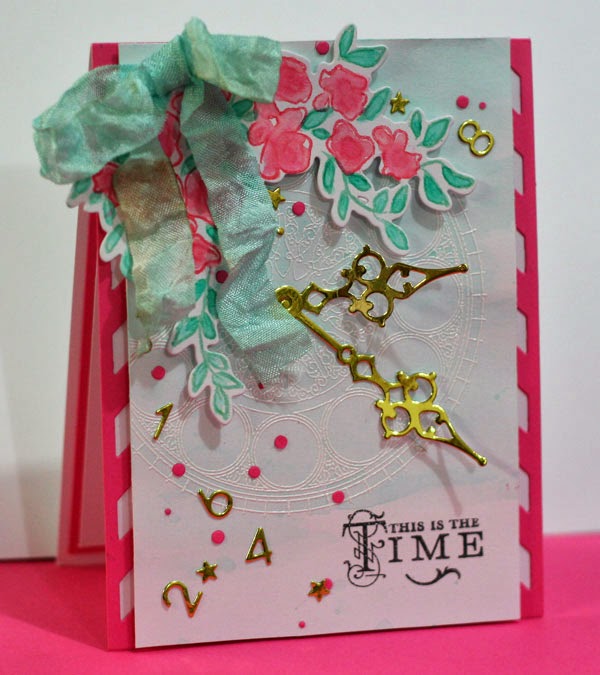
This is the Time - Make it Monday #155 Make Your Own Confetti

Happy Sunday sweet friends!!  I knew the minute my friend Audrey mentioned this week's MIM Challenge, I was going to have to participate.  Danielle Flanders made the cutest card using die cuts and I was completely inspired.  I wanted to make confetti using something more than just generic confetti and the beautiful Papertrey Ink Hands of Time stamp set came to mind and so idea came to life.  The passing of time.  Confetti numbers.  A little gold to add class and sophistication.
Here's my idea come to life:
 I started by stamping the sentiment on the paper.  I knew where I wanted the sentiment to be and I planned to watercolor the background, so it worked best to stamp the sentiment first.  I stamped the clock face with Versamark and heat embossed with fine white embossing powder.  I water colored the background with a light aqua hue and then I stamped and water colored the florals.  I just love the Garden Grace florals!! They are so fun to watercolor!

I die cut the confetti with PTI's Number Time Trio Dies, Star Gazer Die Collection, Heart Stitches Dies, and the very top of the Front and Center Die.  The clock hands are die cut from Gold Foil Paper.
The inside of the card contains a familiar quote that supports the passing of time theme as well as the sentiment.  I can't tell you how much fun I had making this card!

Supplies used:
Papetrey Ink Hibiscus Burst and Stamper's Select White Cardstock
Papertrey Ink Garden and Hands of Time Stamps and Dies
Reeves Water Colors
Bazzill Gold Foil Cardstock
Papertrey Ink Chevron Cover Plate
White Embossing Powder
Papertrey Ink Aqua Mist and Berry Sorbet Ink
Hand Dyed Seam Binding Ribbon

Thanks for stopping by!!
Wishing you a wonderful and crafty week,
Kristii

Monday, March 10, 2014

Just for Fun!!

Hi there dear friends!!  It's been a while since I have posted and I am so excited to say that I finally found my mojo!!  I have been so busy with work and updating our house that I haven't had a lot of time for crafting.  I just gotta say it feels so good to get my creative juices flowing again!!  Today I have a little card I made just for fun using Papertrey Ink's Garden Grace Stamps!! I love these stamps and I know I will be using them again and again!!
I sprayed the base layer with Heidi Swapp Blush Color Shine and Stencil Set.  I stamped the florals with the Pink Ink Pad from Heidi Swapp and I stamped the leaves with Papertrey Ink Limeade Ice. I watercolored the inside with various Papertrey Ink Pads.  The new Papertrey Ink Luxe Letterpress sentiment is promising to be one of my all-time favorite Happy stamps!  It is supposed to be stamped at an angle, but I rebelled and stamped it straight across.  I love it!!  It's even better stamped with Heidi Swapp's Pink Ink!!  I topped off the card with a hand dyed seam binding ribbon.  I can't wait to give it away!!


Supplies Used:
PTI Garden Grace Stamps and Dies
PTI Luxe Letterpress Stamps
PTI Stamper's Select White Cardstock
PTI Sweet Blush, Summer Sunrise, Hawaiian Shores, Limeade Ice, and Orange Zest Inks
Heidi Swapp Pink Ink
Heidi Swapp Star Stencil Set
Heidi Swapp Blush Color Shine

Thanks for stopping by!!!
Have a wonderful evening!!
Kristii

Sunday, January 26, 2014

Papertrey Ink MIM #149: Glitter Embellishments

Happy Sunday sweet friends!! It's been a great weekend and I am so excited to say I've been a bit crafty!!  I got my new PTI Doodlie-do stamps and just had to make a quick project and since this week's MIM project had to do with Glitter, I didn't need any more persuasaion!!

Make It Monday #149: Glitter Embellishments

I started off by stamping the Doodlie-Do flowers onto vellum with Versamark Ink and the added fine white embossing powder and heat set them.  I die cut the image with Sweet Blush and Simply Chartreuse papers and layered the embossed images on top.  I added coarse crystal glitter to all of the centers to go with the theme of the challenge.  To make the base panel, I picked up some Heidi Swapp Blush Colorshine and Stencils at Michael's and sprayed the the diagonal lines onto Stamper's Select white paper.  I am just loving the stenciled technique for backgrounds!! It's so fun and so easy to create custom backgrounds for any project!!

Supplies Used:
PTI Stamper's Select White, Simply Chartreuse,  and Sweet Blush Cardstock
PTI Vellum Cardstock
Heidi Swapp Stencil
Heidi Swapp Blush Color Shine
PTI Doodlie-Do Stamps and Dies
Martha Stewart Crystal Glitter

Wishing you a creative day!!

Kristii

Friday, January 17, 2014

Pink Persimmon Sewing Notions and Classic Pattern

Happy Friday Dear Friends!! Are you ready for some classic vintage goodness?  I am loving Pink Persimmon's new Classic Patterns and Sewing Notions stamp sets!!  They are absolutely awesome and very easy to work with!!  I made a rather clean and classic card using these stamps and it's one of my favorites of the year!!
I embossed the Classic Pattern stamp onto some vellum.  This technique makes my heart so happy and even happier in gold!!  I also embossed the sweet little button under the scissors on vellum in gold!  The measuring tape and pink button are embossed using pink zing powder!  Gotta love pink embossed images!  I also embossed the scissors in gold onto white paper.  It's a little more crisp than the embossed images on the vellum are.  The spool topper is stamped with black ink on gold paper and the effect is exactly what I was looking for!! Love the gold and pink combination!!  Doesn't it make your heart sing???  I typed out the sentiment in PSE, printed it and then die cut the image.
Supplies used:
Pink Persimmon Classic Pattern and Sewing Notions
Maggie Holmes Flea Market by Crate Paper patterned paper
Vellum Paper by Papertrey Ink
Fine Gold Embossing Powder
Bush Zing Embossing Powder
Sweet Blush ribbon Papertrey Ink
Stamper's Select White Cardstock

Thanks for stopping in!! I appreciate all of you who visit!!
Kristii

Monday, January 13, 2014

CupCards to Go Valentine Kit Reveal

Happy Monday Friends!!  I am so excited to share my designs from the CupCards to Go Valentine's kit. This month's kit is absolutely amazing and filled with so many Valentine's Goodies, you'll be able to make a ton of Love-ly cards!!  From Shabby Chic goodness to CAS simplicity there's something for everyone!!

The first card I'm sharing with you tonight is my favorite of the bunch.  The rub ons that are included in the kit are a part of my focal point as well as the sweet layered heart and fussy cut birdies.  Love, love, love the little quote!!
The challenge this month was to create a pocket card to hold some of the fun little Love Notes that are included in the kit.
 When you take out the notes, you find a sweet little surprise!
 I was really in a Clean and Simple mode with this kit.  Love, love, love me some white space and there are plenty of embellishments to make a handful of CAS cards!!
This card was inspired by the sketch for this month.  I just had to put the embellishments toward the bottom corner rather than in the middle, I just couldn't help myself...wink, wink!  I layered several die cut hearts to make a nice thick embellishment.
Love, love, love this technique! The top layer is made from printed vellum and I do have to say that is my favorite paper in the kit!! Vellum is my new favorite!!
If you've followed my blog for any length of time, you know how much I love shaped cards.  The beautiful Turquoise bow totally inspired this card!!
The angled design has become one of my favorite go to sketches.  So quick and easy and effective too!!
These cards came together so easily and I have more ideas on tap using the goodies in this kit!! You're gonna love it!!

Thanks for stopping by and I wish you a wonderfully creative day!!
Kristii