
Happy Saturday sweet friends!!! Today's post is all about using what you have around the house to create seasonal decorations!

I have a whole box of blocks that have been sitting around waiting for grand kids to play with them. Since grand kids aren't in our near future, I'm going to use the blocks to create some fun seasonal decorations. The blocks started out like this:
 I used Glitz Design's Happy Travels Digital Papers Kit for this project. They are some of my all time favorite papers and now that they've gone digital, there are so many more possibilities.
I used Photoshop Elements to add an orange tint to the papers:

 I glued the papers to the blocks with Zip Dry, so that I could remove the papers from the blocks easily (just in case I want to use the blocks for the next holiday or if grandchildren are on the way...a girl can always dream....lol!!!)
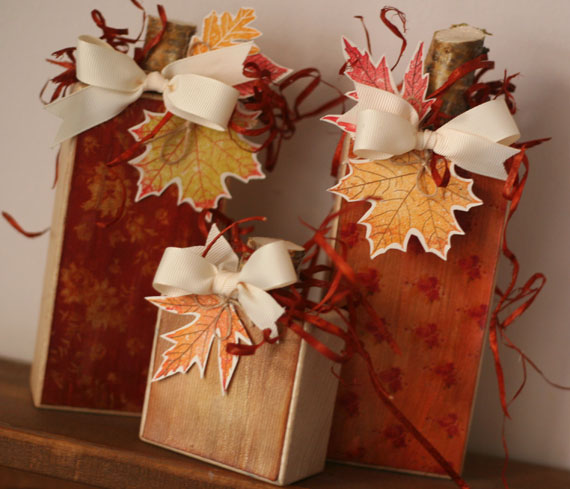
 I embellished each pumpkin with some stamped leaves, ribbon, twine and some rust colored Excelsior.
 My sweet hubby cut a tree branch into 1 - 2 inch pieces for the pumpkin stems and I just love the look!


Supplies Used:
Glitz Design Happy Travels Digital Paper Kit
Other supplies: Wood Blocks; Papertrey Ink Leaf Prints Stamp Set; Papertrey Ink Rustic Cream Cardstock and Ribbon; Tree Branch; Tim Holtz Distress Ink, Papertrey Ink Pure Poppy and Harvest Gold Ink; Excelsior
Thanks for stopping by!!!
Wishing you a very Glitzy Day!!!
Kristii
I have a whole box of blocks that have been sitting around waiting for grand kids to play with them. Since grand kids aren't in our near future, I'm going to use the blocks to create some fun seasonal decorations. The blocks started out like this:

I used Photoshop Elements to add an orange tint to the papers:
- Click Enhance
- Click Adjust Color
- Move the hue slider to the right until you find the color you're looking for
- Resize the paper to 6x6

After printing the papers, I trimmed them slightly smaller than the blocks. I brushed Tim Holtz' Rock Candy Distress Crackle Paint onto each of the papers and allowed them to dry. After the papers were dry, I ran an embossing gun over the dried papers just to flatten each out so they would be smooth and ready to glue to the blocks. Then I worked distress ink into the cracks to make them stand out a bit more.


Such a fast and easy way to make fun seasonal decorations! I hope I've inspired you to create a seasonal project using items from around your house!! It's fun and economical too!!

Glitz Design Happy Travels Digital Paper Kit
Other supplies: Wood Blocks; Papertrey Ink Leaf Prints Stamp Set; Papertrey Ink Rustic Cream Cardstock and Ribbon; Tree Branch; Tim Holtz Distress Ink, Papertrey Ink Pure Poppy and Harvest Gold Ink; Excelsior
Thanks for stopping by!!!
Wishing you a very Glitzy Day!!!
Kristii
6 comments:
Eeee!! I just LOVE these! They have been Pinned! :)
Oh, I LOVE these ones!! The leaves look perfect, the twig is the best touch, and they look so pretty all grouped together!
Really like these! I wish I had some wood blocks lying around. Maybe I will go to home depot and see if they have any scrap lumber!
Thanks for sharing your adorable project!
Susan
These are really cool! I've seen painted style ones, but I really like it with paper. Great use of the leaves!
You did such an awesome job with your first Step by Step Saturday post, Kristii! Thanks for putting so much hard work into it...I think our readers learned a lot!
OMG!!!! This is totally AMAZING and beautiful! Thanks for sharing!
Post a Comment