Sunday, November 13, 2011

Card Patterns #141

Happy Sunday Dear friends!!  I hope you've had a wonderful weekend full of family and creativity!!  We have a fabulous sketch for you this week at Card Patterns that features a new twist from the design team.  All of our cards are made with digital software.  I for one have never used digital software to make a card before, so it was a great week to stretch my creative side!!

Here's the sketch:
This week's sponsor is:
This week we're sponsored by My Memories: maker of digital scrapbook software. 
My Memories Blog: http://blog.mymemories.com/
My Memories on FaceBook: http://www.facebook.com/mymemoriessuite

My Memories supplied each of us with software to use in our creations this week.  I am excited to say that 
My Memories has provided Card Patterns readers with a coupon worth $10 off the software and $10 to use in the store- a $20 value! Just use our code when downloading:  code: STMMMS36252


Prize: One lucky participant this week will win 1 free copy of the My Memories Suite digital scrapbooking software ($40 value).

I chose to do a hybrid card with the software.  I just have to touch and feel my projects, so going completely digital isn't an option for me.  The software took quite some time to figure out, so I feel like I have a lot to learn regarding the whole digital genre.  I am excited to learn more about hybrid crafting and you will see more hybrid cards from me in the future!

Here's my take on the sketch:
First I printed the digital patterned paper and then I printed the banner and the dots onto the card base.  I felt that the spacing was fairly easy to figure out in the program. Next, I printed out several digital elements to fussy cut and glue to my card base.
After I fussy cut all the elements, I added glitter, buttons, jewels and twine to finish up the card.
It's a pretty simple card, but it was a great learning experience and I'm hoping to do better with digital goodies in the future!!

Supplies Used:
My Memories Software
My Memories All I want for Christmas Pack and Word Art
Papertrey Ink Rustic Cream Cardstock Holly Jolly Die, and Button Twine
Kaiser Craft Rhinestones
Buttons from my stash

Thanks for stopping by!!!
Have a great evening,
Kristii

Sunday, November 6, 2011

Card Patterns #140

Happy Sunday dear friends!! We had a very busy, yet absolutely wonderful weekend!  I am a little behind in getting my Card Patterns project up, but better late than never!!

This week's sketch:
and sponsor:
I just have to say that Kimberly, at My Craft Spot, has the most wonderful scrunched seam binding!!!  You all know how much I love seam binding bows and I am soooo thrilled to have the opportunity to work with her beautiful ribbons!!

Here's my take on the sketch:
I used my favorite Christmas papers, Season's Greetings by Echo Park and added some stickers, lace, ric rac, pine bough punches, a little bling, and Wonderful Words-Holiday die cuts from Papertrey Ink.
I also tied together 2 rusty jingle bells with some twine from My Craft Spot.  I can see I am going to have to order some more jingle bells!! I just love them!!!

Supplies Used:
Papertrey Ink Pure Poppy and Rustic Cream Cardstock
Echo Park Season's Greetings Papers and Stickers
My Craft Spot Srunched Seam Binding and Baker's Twine
Prima Lace
McGill Bough Punch
Kaiser Craft Rhinestones

Thanks for stopping by!!! I'll be back tomorrow with my Monday Prickley Pear Post :)
Have a wonderful evening!
Kristii

Wednesday, November 2, 2011

CupCards {to Go} Holiday Kit Reveal

Hi there dear friends!! Today is the reveal of the CupCards {to Go} Holiday Kit !! Whooo hooo! What a fabulous kit it is!! There are so many possibilities with this kit.  When I first saw this kit I imagined fun and whimsical cards as well as cards with a shabby chic flair!  You can do it all with this kit!!!
My first project with this kit features a clear mini tube from SRM Stickers and a sweet little snowman stamp by Imaginisce found in the Holiday 2011Toppings.  I totally love this sweet little snowman!!!
The ribbon in the Holiday kit is absolutely delicious!!  I would love a whole roll of this ribbon, that's for sure!!!  I used my PTI Tag Sale #3 and #5 dies for the tags and also the Damask Snowflake Die.  These have all become fast favorites of mine!
There were so many fun stickers in the holiday kit, I just had to use a couple on my project!!
I filled my little project with red m&m's since the Christmas Candy wasn't out in the stores yet, but I know that someone is going to appreciate this sweet little gift!!

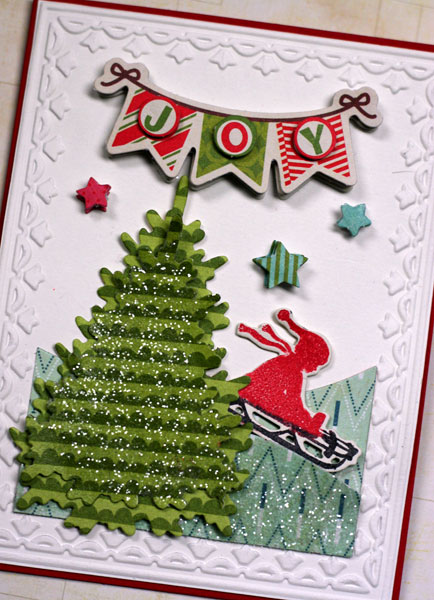
My next project features a fabulous red card base and envelope that are included in the kit!!  What a great way to start your Christmas Card Projects!  I used the dimensional stickers for this project as well as Papertrey Ink's In the Meadow stamps and dies.  Such a fun and easy card!!
I embossed a slightly smaller cardstock panel with a Stampin Up! Framed Tulip embossing folder.  I die cut the trees and hills and added some Martha Stewart Glitter to the top layer of each.  You can never have too much glitter on Christmas Cards!!
I decorated the inside of the card as well as the envelope, which makes it very special indeed!!!  The stamped sentiment is from PTI's Inside and Out Holiday Set.
The next card I made from the kit is a nice and easy card!  You will find it featured as a step by step card on the Cup Cards {to Go} Blog.
I added some lace from my stash to make this card and I used one of the very sweet buttons found in the kit.
I also decorated the envelope that goes along with this card which will make it perfect to give personally to special friends!
The next card was made using this month's Holiday Kit sketch.  Here's the sketch:
and here's my take on the sketch:
I used the gorgeous papers from the kit and added a fun little wreath made from punches from the McGill Bough punch.  I selectively cut "& joy" from one of the sentiment stickers and used a tag from the kit to complete the sentiment.  There are so many ways to mix and match the goodies in this kit!!
I also had to add some rusty jingle bells to this card!! I tell you, jingle bells are my favorite this year!!
My last card is a fun, quick and easy card using the die cuts from the kit.
I trimmed some ribbon and added it to the base of the card and then I layered the little elf behind the sleigh so it looks like he's peeking out.  I used another one of the sweet little buttons from the kit to make a little embellishment along with some stamped leaves from Prickley Pear Rubber Stamps.  I also decorated the envelope to make this card extra special too!

I have many more ideas for this kit and hope to post them soon!!!  I hope you get a chance to order a kit for yourself!  It's absolutely fabulous!!!

Thanks for stopping by!!!  I appreciate you all!
Kristii

Tuesday, November 1, 2011

Beautiful Dreamer Nostalgia and Whimsey

Happy November dear friends!!  Can you believe how quickly this year has gone by?  I've had so much fun playing with Glitz Design goodies this year and the fun continues!!  Today I have some fun little cards featuring Beautiful Dreamer goodies. 

The first card for today features Glitz Design Polka Paper and a vintage photo layered onto a Beautiful Dreamer Journaling Sticker:
I stamped the bottom of the card with the edge of the Beautiful Dreamer "A Girl Should Be" stamp and I love the nostalgic look it adds to the card.  Love, love, love that stamp!!
Supplies Used:
Glitz Design "Beautiful Dreamer" Papers:  Polka
Glitz Design "Beautiful Dreamer" Stamps
Glitz Design "Beautiful Dreamer" Cardstock Journaling Stickers
Other Supplies:  Papertrey Ink Rustic Cream Cardstock, Parisian Doily Die, and Embellishments Stamps; Prima Lace and Floral; Melissa Phillips Tea Dyed Twill Tape; Tim Holtz Tea Dye Distress Ink by Ranger; Crafty Secrets Heartwarming Vintage Creative Scraps


I also made whimsical little Christmas Card with the Beautiful Dreamer goodies.  I think Beautiful Dreamer makes the most beautiful Christmas Cards!!
I used Beautiful Dreamer Polka Paper once again and added the beautiful bird stamp from the Vintage Blue Collection.  What a fabulous stamp it is!!!
I added some glittered die cut Christmas trees and layered them on top of the Parisian Lace Doily Die and embellished with some tea dyed seam binding, lace, floral and button.

Supplies Used:
Glitz Design "Beautiful Dreamer" Papers:  Polka
Glitz Design "Vintage Blue" Stamps
Other Supplies:  Papertrey Ink Rustic Cream Cardstock, Vintage Ornament Stamp (Sentiment), Double Edged Banner Die, Button, Button Twine, Parisian Lace Doily Die, and Love Lives Here Die; Prima Floral and Lace


Thanks for stopping by!!
Wishing you a very Glitzy Day!!!
Kristii

Monday, October 31, 2011

Monday Mornings with Prickley Pear Rubber Stamps: Cat and Pumpkin

Happy Halloween Dear friends!!!  I hope you have a frightfully fabulous day!!!  I have a fun little Halloween card to share with you today featuring Prickley Pear Rubber Stamps' Cat and Pumpkin stamp.
I stamped the Cat and Pumpkin with Versamark ink and then embossed it with black Ultra Fine Embossing Powder.  Then I took my new Tim Holtz Distress Ink in Seedless Preserves and Ripe Persimmon.  Don't you just love the new colors?? I used my Cricut to cut out the spider webs using the Paper Doll Dress Up Cartridge and cut out several different sizes of spider webs.

Supplies Used:
Prickley Pear Rubber Stamps' Cat and Pumpkin 
Papertrey Ink Real Black Cardstock and Twill Ribbon
Ultra Fine Embossing Powder
Tim Holtz Distress Ink: Seedless Preserves and Ripe Persimmon
Versamark Ink
Provo Craft Cricut Machine and Paper Doll Dress Up Cartridge

Sunday, October 30, 2011

Card Patterns #139

Happy Saturday Dear Friends!!  It's Card Patterns Saturday and I have a fun little card to share with you!!! I have some fun Echo Park Season's Greetings Papers and the patterns totally remind me of a Nordic Christmas.  Here are some photos that inspired me:

Here's the Card Patterns Sketch:

and here's my take on the sketch:
I used some Vintage Hymnal paper (complete with Christmas lyrics) to add some vintage goodness to my Nordic themed card.  A close-up of the tab shows all the layers involved as well as a sweet little jingle bell and punched greenery.  I am so into jingle bells this year!!  I love them!
Supplies Used:
Papertrey Ink:  Rustic Cream Cardstock, Pure Poppy Premium Dye Ink, Tag Sale #3 and #5 Dies, Damask Snowflake Die, In the Meadow Stamps and Dies, and Button Twine; Echo Park Season's Greetings Papers and Stickers; Vintage Hymnal Paper; Martha Stewart Glitter; McGill Pine Punch; Jingle Bells from Michaels; Ribbon from Joann Fabrics

I appreciate you stopping by!!
Hope you have a wonderful day,
Kristii

Wednesday, October 26, 2011

CupCards {to Go} Holiday Kit Sneak

Hi there dear friends!!!  I hope you're having a wonderful evening!!  I've been playing with my CupCards {to Go} Holiday Kit and I've been having a ton of fun!!! You are just going to love this sweet little kit full of holiday goodies!!!  While you are waiting for the reveal, I have a fun little sneak peek for you:
I can't wait for the reveal!!! It won't be long now!!!
Hope you have a wonderful Thursday!!!
Kristii

Monday, October 24, 2011

Monday Mornings with Prickley Pear Rubber Stamps: Ellie

Happy Monday everyone!!  I'm thinking these Prickley Pear Monday Posts are making Mondays a lot more fun these days!  I'm always excited to show you something new from Prickley Pear Rubber Stamps!!  Today's post features sweet little Ellie:


and some red and aqua love.  Aren't the two colors together divine?

I started off by stamping Ellie on several different colors of Echo Park Season's Greetings Papers.  I fussy cut each one out and paper-pieced them together.  I added some pink to her cheeks by dabbing the Blending Pen with an R 81 Rose Pink Copic Marker and lightly coloring her cheeks.  I added some jingle bells to her bow and layered her on top of the Prickly Pear Rubber Stamps Scalloped Oval Die.
I used the Viva La Verve October Week 4 sketch for this week's card:
and this is my completed card!!
Supplies Used:
Prickley Pear Rubber Stamps: Ellie
Papertrey Ink Papers:  True Black
Echo Park Papers and Stickers:  Season's Greetings
Sewing Machine
Jingle Bells from Michael's
Copic Markers: R81 and Blending Pen

Thanks for stopping by!!
Wishing you a wonderful Monday,
Kristii

Saturday, October 22, 2011

Card Patterns #138

Good Morning dear friends!! I hope you are enjoying your Saturday!  It is a little cloudy and misty here today which makes it a perfect day for baking cookies, reading a good book,  and playing in my studio.  I hope I have time to do a little of each today, but goodness knows once I start working on my cards, the time just flies right on by!

If you are looking for a good sketch to get your creative juices flowing, here's the sketch from Card Patterns this week:

our sponsor is the ever so generous Catherine Pooler:
Catherine Pooler has been a Stampin’ Up demonstrator for almost 8 years. Her favorite Stampin’ Up products are the punches and anything in coordinating colors such as the ink, cardstock and patterned paper! That safely covers most things in the SU catalog! ;)  One random participant this week will win Stampin' Up's Birthday Party Rub-ons!


I totally have Christmas on my brain today, and when I saw the beautiful red polka dot papers in the  Play Date Designer Series kit from Catherine Pooler, I knew I was going to have to make a poinsettia for today's card! I cut the flowers with my new PTI Christmas Poinsettia die.  To finish off my card, I embellished it with some beautiful Stampin Up! Old Olive ribbon, also from Catherine Pooler.

Supplies used:
Play Date Designer Series Kit
Stampin Up! Whisper White Paper
Stampin Up!  Old Olive Satin Ribbon
Prima Lace
Papertrey Ink Cream and Simply Chartreuse felt
Dies:  PTI Wonderful Words Holiday Die Collection, Edgers #3 and Christmas Poinsettia
Recollections Floral
Vintage Hymnal Paper

Thanks for stopping by,
Kristii

Tuesday, October 18, 2011

Beautiful Dreamer Friends and Christmas

Hi friends!!!! I hope you're having an absolutely splendid day!!!  I can't tell you how excited I am to share some cards I made with Glitz Design's Beautiful Dreamer goodies today!!   You will see just how versatile the Beautiful Dreamer papers are!  

The first card is all about friendship!  Giving that special friend in your life something pretty to brighten up her day is what this card is all about!

I used a Beautiful Dreamer Paper layer as the base of my card.  Isn't it just divine?  Next, I stamped the lacy image from the Vintage Blue Stamp Set along the bottom!! Don't you just love the intricate pattern? It's absolutely beautiful!! I added a contrasting scalloped border, buttons, floral, bow and sentiment.  Such a beautiful card and it took no time at all!  The Glitz goodies speak for themselves!
Supplies Used:
Glitz Design "Beautiful Dreamer" Papers:  Polka and Floral
Glitz Design "Beautiful Dreamer" Paper Layers
Glitz Design "Vintage Blue" Stamps
Other Supplies:  Papertrey Ink:  Rustic Cream Cardstock, Double Edged Banner Die, Buttons and twine; Making Memories Love Notes Shaped Pins; Prima Floral; Joann's Ribbon; Memento Tuxedo Black Ink; Tim Holtz Tea Dye Distress Ink; Stampin Up Scallop Punch;

The second card takes on a different twist with the Beautiful Dreamer goodies!!!  The pink stripe paper reminds me of a candy cane and so I just had to make a Christmas Card with it!!  Pure deliciousness!!!
I cut a piece of the stripe paper slightly smaller than my 4 1/4" x 5 1/2" card base, cut the bottom third off and flipped it over to use as contrast.  Such an easy way to get the exact measurement that you need.  I punched the bottom edge of the contrasting paper and it added a little visual interest to the bottom of the card.  Then I die cut some snowflakes and deer.  I inked and glittered the snowflakes and inked the edges of the deer.  I layered the snowflakes, a Beautiful Dreamer Journaling Tag, and the deer as shown.  Then I added some lace, ribbon, jingle bells, buttons and twine to embellish.  I layered the sentiment under the deer for effect.
Supplies used:
Glitz Design "Beautiful Dreamer" Papers: Stripe
Glitz Design "Beautiful Dreamer" Trim
Glitz Design "Beautiful Dreamer" Journaling Tag
Other Supplies: Papertrey Ink Rustic Cream Cardstock, Love Lives Here: Christmas Stamps, Damask Snowflake Die Collection, Double Edged Banner Die, Button and twine; Tim Holtz Dies by Sizzix Reindeer Flight; Vintage Hymnal Paper; Hand Dyed Seam Binding: MemrieMare; Tim Holtz Tea Dye Distress Ink; Prima Lace; Martha Stewart Glitter;

Thanks for stopping by!! 
Wishing you a very Glitzy day!
Kristii

Sunday, October 16, 2011

Let's Get Spooky!!

Happy Monday dear friends!!!  It's Monday and that means it's time for a little Prickley Pear Rubber Stamp goodness!!  Today I made a fun little tag card using the Dancing Skeleton Clear Stamp Set.  What a fun set to play with this Spooky time of the year!!
There are so many options with this fun set!  You could play all day!
I Stamped the Coffin out of Crate Paper's Emma's Shoppe Paper and used it as the tag holder.  I also combined Pink Paislee's Phantom Collection papers as well as Crate Paper's Farmhouse collection.
There's the skeleton bride peeking out of her coffin!  Isn't she lovely?

For inspiration, I used Deconstructed Sketch #23:
Supplies Used:
Prickley Pear Rubber Stamps Dancing Skeleton Clear Stamp Set
Pink Paislee Phantom 6x6 Paper Pad
Crate Paper 6x6 Paper Pads: Emma's Shoppe, Random, and Farmhouse
Bazzill Black Cardstock
Kaiser Craft Pearls
Buttons and Ribbon from my stash
Papertrey Ink Parisian Lace Doily Die and Orange Zest Cardstock
Sewing Machine

Thanks for stopping by!!!
Hope you have a fabulous week!
Kristii