Monday, June 6, 2011

Masculine Cards with Glitz Designs

Happy Monday dear friends!  It's the first Monday of summer vacation and I plan on enjoying every minute of it!!! I have a long list of things to do during the summer month's and celebrating my hubby is one of them!  Father's Day is right around the corner and so is my 27th wedding anniversary and I thought it would be fun to create some festive cards with Glitz Designs!

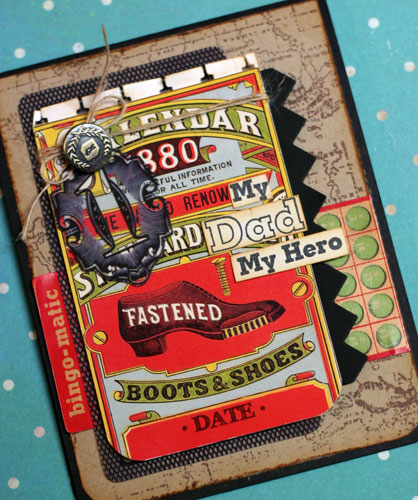
This first card celebrates Dad being a hero, and I tell you what, my husband is worthy of being a hero.  He works extremely hard for his family.  He is kind, caring and compassionate, and he is funny too!  He is the best friend I could ever have, and I am thankful for him.  I know the kids will love giving this card to him!  
 I used Glitz Design Distressing Stamp Set 3 for the background of this card.  I hand-cut the number one from the Love Games Peekaboo and used it as an embellishment.
Supplies used:
Glitz Design Distressing Stamp Set 3
Glitz Design "Love Games" Whatnots
Glitz Design "Love Games" Peekaboos

Other supplies:  Papertrey Ink: Kraft and Rustic White cardstock, My Hero, My Dad stamps, Button Twine, Spiral Notebook Page Die, and Banner Border die; Brushed Corduroy Distress Ink; Memento Rich Cocoa Ink; Button from an old pair of jeans.

I will give this second card to my hubby on our 27th wedding anniversary on June 16th.  I am so happy to say that after all these years, we are more in love today than we were yesterday.  We have so much fun together, and we work very hard to keep our love alive!  We are very fortunate indeed!  I was pretty excited to find a Glitz Design Cardstock Sticker that had the perfect sentiment for this card!!  Glitz Designs has it all!
I impressed the kraft cardstock in the  background with a woodgrain impression plate and I layered some Love Games Glitzers over the Whatnots and Paper Layers to add interest.
Those of you who follow my blog know how challenging it is for me to make masculine cards, but the  colors in these Glitz Design papers are so fun, it wasn't near as hard as I thought is was going to be!  This card was quick and easy and it will be perfect for my sweetie!!

Supplies used:
Glitz Design "Love Games" Glitzers
Glitz Design "Love Games" Paper Layers
Glitz Design "Love Games" Whatnots
Glitz Design "Love Games" Cardstock Stickers Titles

Other Supplies:  Papertrey Ink Black and Kraft Cardstock, Woodgrain Impression Plate; Tim Holtz Ideology Hinge Clips. 


Thanks for stopping by today!!  I look forward to seeing you create a masculine card with your Glitz Goodies!!!  I hope you have an absolutely Glitzy Day!!
Kristii


Wednesday, June 1, 2011

It's a Good News Kind of Day!

I'm so excited to finally share my good news with you!!!
I am now part of the Pink Persimmon Creative Team!!!

Whoooo hooo!  I can't tell you how thrilled I am to be creating with Pink Persimmon's amazing stamps.  Pink Persimmon was founded by Judy and Darcy, two sisters who complement each other perfectly.  Their stamps are created using hand-drawn designs with the highest quality clear photopolymer and they are manufactured in the USA.  Pink Persimmon stamps range from a sweet vintage style to absolute cuteness! I know you will love them as much as I do!!!

Head on over to Pink Persimmon to meet the other members of the creative team and take a look around.  

My first project for Pink Persimmon featured the Little Red Wagon Stamp Set:
This stamp set is my favorite Pink Persimmon stamp set to date....but there is a new set on the horizon and it may take over the number one position.  Stay tuned!!!


Here is my first Pink Persimmon Project:
 Isn't she the cutest?
Here are the Copic Markers I used for this project.  I just purchased some more skin tone markers, so I will be very anxious to do another project with these stamps using some different colors!!
I fussy cut the dress from October Afternoon 5 and Dime papers...so perfect with this set!  I added a died seam binding bow and a pretty little button from Tim Holtz.  Did you know that Pink Persimmon also carries a cute selection of ribbons and trims?  The twill expression ribbon was perfect with this card!
Supplies Used:
Pink Persimmon Little Red Wagon stamps and Twill Expression Ribbon; October Afternoon 5 and Dime papers; Copic Markers; Died Seam Binding: Memriemare; Prima Lace; tim holtz Accoutrements; Bazzill Ruby Red Paper; Papertrey Ink Stamper’s Select White; Memento Tuxedo Black Ink; Stampin Up! Real Red Ink.


Thanks for stopping by and I appreciate you sharing in my joy!!!!
Have a wonderful day,
Kristii

Wednesday, May 25, 2011

PTI May Blog Hop

Hi there dear friends!!  It's time for the Papertrey Ink Blog Hop!!

The-Challenge
May is the month when many flowers finally go into full bloom after a long winter's sleep.  For the blog hop this month we want to see your favorite take on flowers.  You can stamp backgrounds, create custom floral embellishments, showcase unique flower center additions (buttons, rhinestones, beads, etc...), flowers die-cut from different materials (like fabric, felt, vellum, etc...) or anything else you can dream up!  We are looking forward to seeing all of your amazing creations!I have included an inlinkz list below for you to add your link to your blog hop project.  This new type of link list will allow you to select a thumbnail to go along with your link, making it easy to go back and find a project later that might have perked your interest.  

Here's my take on the Challenge:

 I'm sorry for the poor photos.  The ballast in the light I use to take photos went out and we haven't had time to replace it, but you get the idea!  I just had to break out my Garden Variety stamps and dies for this challenge!!  I totally love them!! This sentiment is my favorite!!  I am still having fun with my YOF Daffodils and it was fun to combine the two!!  I love PTI, their goodies coordinate beautifully!!
I will post the rest of the ingredients after I post this to Nichole's blog.
Have a great night!!
Kristii

Building Up your Card Stash with Glitz Designs

Happy Wednesday dear friends!!! I can't believe that Memorial Day is around the corner!  Whether you will be traveling on the first summer holiday of the year, or if you will be home doing yard work and cleaning your house, it's also a good time to build up your card stash for dear friends and loved ones. I used Glitz Designs Paper Layers to help me with this task!

In my first card, the beautiful rose pattern in the Paper Layer inspired me to make a heartfelt sympathy card.  I don't know about you, but sympathy cards are hard to make with all the emotion involved and it is nice to have a few on hand to give to those special friends whose hearts are grieved.
I didn't want to take away from the beauty of the Paper Layer, so I stamped the sentiment on vellum and hand-stitched the vellum strip to the face of the card.
Supplies used:
Glitz Designs "Laced with Grace" Paper Layers

Other supplies:
Papertrey Ink:   Melon Berry and Vintage Cream cardstock, Double Ended Banner and Banner Borders dies, Through the trees stamps; Vellum; DMC Floss; Fiskars Scallop Punch; Pink Paislee Butterfly Garden Ephemera.

In my second card, the butterflies in the Laced with Grace Paper Layer inspired me to create a card that I know that I will need for a friend when I least expect it.
 Aren't the butterflies on this Paper Layer beautiful?

Supplies Used:
Glitz Designs "Laced With Grace" Paper Layers
Glitz Designs "Afternoon Muse" Stripe Paper

Other Supplies:  Papertrey Ink: Kraft and Hawaiian Shorescardstock, buttons, lemon tart ribbon, Tiny Tags Die, Flower Fusion #2 stamp set; Prima Lace; Pink Paislee Butterfly Garden Ephemera; DMC Floss; Fiskars Scallop Punch.

I hope this inspires you to make some cards for your stash.  
You never know when you will need a card for that special someone!!

Thanks for stopping by and 
I wish you a very Glitzy Day!!!
Kristii

Wednesday, May 18, 2011

Sharing my Heart

Hi there dear friends!  As you can see my blog has been changing a bit over the past weeks and will continue to do so over the weeks to come.  A dear friend of mine, Viola Mahr, is helping me with my blog and she is the sweetest, most talented person I have met in the cyber world!  I do have to mention that she is a mere 18 years old and truthfully, she is talented beyond her years!  Thank you Viola for all that you are doing!! I appreciate you!  It is my goal to make my blog pretty and informative all while sharing my heart with you!
School will be out in three weeks and I intend to spend the summer creating, teaching, and blogging regularly!  I'm also going to be building up my Etsy Store and selling my goods at the Gallatin Valley Farmer's Market.  I am so excited about all these ventures and it wouldn't be possible without you!!!  Thank you for all of your encouraging comments and for supporting me over these past years.  I appreciate all of you!

I wanted to add the card back into my blog that you can see in this edition of Cards Magazine:


This card was made in remembrance of a dear friend of mine who went to be with Jesus last September.  I poured my heart and soul into this one and was so blessed when it was picked up by Cards Magazine!  I miss you Margaret and I pray for your family regularly!
Supplies used:


All the following items are from Papertrey Ink:
Kraft Paper
Felt
Stamps: Through the Trees; Background Basics Tin Types
Twine
Ink:  Dark Chocolate
Other Ingredients:
Ranger Distress Ink:  Crushed Olive and Brushed Corduroy
Kaiser Craft Pearls
Fiskars Pinking Shears

Thank you for stopping by and I look forward to sharing with you more in the days to come!
You are special and I appreciate you,
Kristii

Tuesday, May 17, 2011

A Thankful Heart and LRS Reveal

Hi there dear friends!!  I hope all is well with you!  I am writing this post with a thankful heart this morning!  Yesterday my son was involved in an accident that totaled his car, but I am so happy to say that everyone involved was ok!  He has a scratch and a bruise and his neck is sore, but he is ok!  I can't even begin to tell you the depths of thankfulness that abound in my heart this morning!   Thanks be to God, who I am certain was watching out for all involved!

Times like this make me very thankful that I have a creative outlet too.  I pour my heart and soul into my creations and it is so therapeutic for my soul!  It was my turn to create a sketch for the Little Red Scrapbook blog this month and I made a very basic sketch for all to play with:

I love getting out those old photos of my kids and think back to the good old days!  I chose an Easter picture from 1992 for my first layout for the Little Red Scrapbook May kit.  I used to make matching dresses every year for the girls and these dresses were two of my favorites!  For the layout, I punched the edges of the patterned paper with a Martha Stewart edge and corner punch.  I just love shaped background papers!!

I just loved all the chipboard stickers included in the kit!  So much fun to play with!
The bow was strategically placed so that it covered up the "cute" on the circular tag.  I liked using the Pink Paislee alphas as the main title.
 The yellow tissue paper in the kit was perfect for a little layered sunshine.
 In the next layout, a momma robin built a nest in a wreath hung by the back door.  We could see her perfectly by opening the back door just a bit.  Such sights warm my heart clear through!
I colored the Pink Paislee Alphas with a Light Prawn Copic Marker and I loved the results!

I just love the photo of Heidi in this next layout!!! Isn't she the cutest?
 I made a sweet little scrunched flower with the tissue paper in the kit and added a sweet little bow.
I was really into all the banners included in the kit and decided to make one of my own with my Papertrey Ink Banner Dies, so fun!!!
 Don't you just love this sticker combination?  Bee Happy?  Gives me a smile just thinking about it!
 I wanted to make some quick and easy cards out of these cute little stickers.  I stamped the sentiment onto the card and onto another sheet of paper.  I used the sentiment stamped on the paper to mask the sentiment on the card and then I stamped a dot background over the middle third of the card.  Such a quick and easy way to cheer up a friend!!
Thanks for taking the time to stop by my blog!!!  I appreciate you letting me share my heart with you!
Have a wonderful day,
Kristii

Friday, May 13, 2011

Little Red Scrapbook Sneaks!!

Hi there dear friends!!!  Happy Friday!!!  I am so excited that it's Friday!  My sweetie is off and we are going to the river with a sweet little picnic!  Ahhhh, it will be heavenly! Spring has finally arrived in Montana and we are going to celebrate!

In the meantime, I want to leave you with my LRS sneaks for May!!!  What a sweet kit it is!!  The embellishments are absolutely fantastic and so easy to work with!! I hope you were able to get your hands on one of these kits!!!  You will love it!!

Here's the kit:
...and here are my sneaks:


I hope you have an absolutely fabulous weekend!!
I treasure you all!
Kristii

Wednesday, May 11, 2011

Creating my own sunshine with Glitz Designs

Hi there dear friends!  I hope this post finds you having a wonderful day full of sunshine and blue skies.  If you don't have any sunshine at the present time, I hope that you find a way to create your own.  My favorite way to create sunshine on a cloudy day, is to design a card that will bring a smile to someone else's day.  Ahhh...there is no greater joy than that!!

My first card is made with Glitz Designs Laced with Grace Whatnots.  It doesn't get any easier than using a Whatnot as the base and embellishing your card with pretty little goodies.  I am sure this little card will be the perfect cure for a cloudy day for a friend or loved one!

I added pearls to the centers of the flowers....sooooo pretty,

and I colored my white hug snug seam binding with Tim Holtz Chipped Sapphire ink using a blending tool...so easy!!

I grounded the Whatnot to the card base using a thin scalloped border.  

Supplies used:  
Glitz Design "Laced with Grace" Whatnots
Glitz Design "Laced with Grace" Paper Layers

Other Suplies:
Papertrey Ink Cardstock:  Kraft and Vintage Cream
Papertrey Ink Dies and Stamps:  Tiny Tags and Parisian Lace Doily
Martha Stewart pearls
Bazzill Cardstock
Fiskars Scallop Punch
Webster's Pages Bloomers
Hug Snug Seam binding
Tim Holtz Ink:  Chipped Sapphire and Brushed Corduroy
Making Memories Stick Pin


Next up, I created a sweet little vintage card to welcome baby.  How fun to send a keepsake card to a brand new mom and brighten her day!!

I used a Stampin' Up! embossing folder to emboss the base of my card.  Then I added some Brushed Corduroy distress ink to make the embossed images pop!

I added a Laced with Grace Journaling sticker and an Afternoon Muse Peekabo and had the perfect focal point for this little vintage card.


Supplies used:
Glitz Designs "Laced with Grace" Journaling Sticker
Glitz Designs "Laced with Grace" Paper Layers
Glitz Designs "Afternoon Muse" Peekaboo


Other Supplies:
Papertrey Ink Cardstock:  Sweet Blush and Vintage Cream
PTI Buttons and Button Twine
PTI Stamps 2010 Anniversary edition
7 Gypsies Paris Dangle Charms
Seam Binding: Memriemare
Stampin Up! Embossing Folder:  Vintage Wallpaper
PTI die:  Double-Ended Banner and Banner Borders


I hope this gives you some ideas on creating your own sunshine.  Whether you create for yourself or for someone else.  Creating is the best way I know to add a little happiness to the day!!!


Wish you a Glitzy Day,
Kristii


Tuesday, May 10, 2011

Glitz in Review

Hi my dear friends!!  I hope you are all staying warm and dry during these rainy spring days.  I love the rain.  The fresh smell causes me to pause and be thankful for the beauty in the day.  

Glitz Designs Laced with Grace papers remind me of the beauty of the day as well.  The warm colors and beautiful designs cause me to smile.  I was making a card using these beautiful papers and wanted to add some seam binding to enhance the gorgeous embellishments I was using.  I had some plain white seam binding, but no soft orange spray to dye it with.  I came up with a quick and easy way to color my seam binding and you can find out how I colored it in this week's Featured Artist Article at Scrapbook News and Review!

Thanks for stopping by my friends!!
I appreciate each and every one of you!
Have a wonderful day,
Kristii

Sunday, May 8, 2011

Happy Mother's Day and Get Your Glitz On Challenge 2

Happy Mother's Day to all my wonderful friends who are moms!!! I hope you have a wonderful day!!
“Being a full-time mother is one of the highest salaried jobs in my field,       since the payment is pure love.”. Mildred Vermont
Glitz Design Challenge
I want to invite you to play along with us at Glitz Designs this month!  Here's the challenge:

Here's my take on the challenge:
Love these Glitz Design Love Games Papers!!  They're gorgeous!!

Supplies Used:
Glitz Designs "Love Games" Papers, Glitzers, Titles, and Paper Layers; Kaiser Craft Jewels, PTI Buttons, and ribbon from my stash.
I hope you have the opportunity to play along!!                                                                  Hope you have a wonderful day,
Kristii

Thursday, May 5, 2011

Make It Monday Challenge and Happy Mail

Hi there dear friends!!  This has been a very exciting week! My Etsy Store has been busy, I'm making plans for the summer and I received some very good news!!  I can't wait to share my news with you, but that will have to wait a couple of weeks!!!  Until then, I have a card and some Happy Mail to share with you!

Make It Monday #13: Impression Plate Tricks #2

This week's MIM Challenge is absolutely awesome and I know I will be using this trick frequently in the days to come!!  I just love the look of the smooth label in the impressed background!

I took the PTI Diamonds Impression Plate and the PTI Jar label and made a sandwich for my Big Shot in this order:

Big Shot
  • Impressing/Embossing platform
  • Plate
  • Impression Plate
  • Die face up
  • paper
  • Impression Plate Mats
  • Plate

Isn't this the coolest effect?  I love it!  I added a Banner Border Die Cut, some Copic colored Daffodills, a button and a scalloped edge.  Easy Peasy and it looks so complicated!!!
 Supplies used:
PTI cardstock:  Aqua Mist, Vintage Cream
PTI dies:  Jar Label,
PTI Embossing Plate:  Diamonds
Stamps:  PTI YOF Daffodils, Signature Series Dress Form
PTI Button and Twine
Kaiser Craft Pearl
Ink:  Memento Tuxedo Black; Tim Holtz Brushed Corduroy
Copic Markers

What a fun technique!!!  I hope you give it a try!!!

Happy Mail
I also wanted to share some Happy Mail with you today too!!
My Swap Sister from PTI, Victoria, sent me the most beautiful package this week!!!  Here is what I found in the box:
Here's a close-up of the beautiful bag embellishment!! I love how she used the Doily Dies!! Gorgeous!
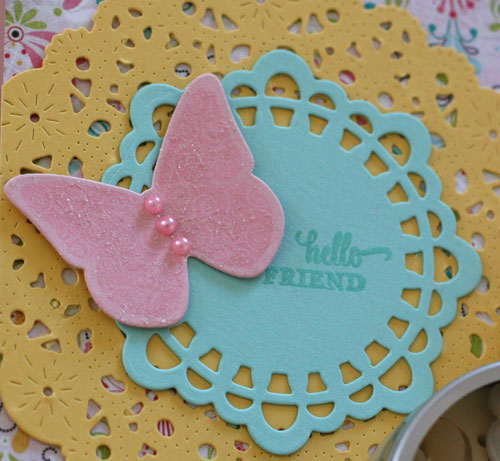
Here is a close-up of the beautiful card she made with more Doily goodness and a beautiful pink butterfly!  I love butterflies and I totally love pink!!!  Thanks Victoria!!!
 Here's a photo of all the goodies in the bag!!!  Ribbon, buttons, cute little envelopes and look at those sweet bird cages!!! Soooo perfect!!! I love them!!!

Thank you Victoria!!! You're the best!!!

It's time to go and make another card....this time with some Glitz Goodness!
I hope you all have a wonderful Friday,
Kristii