Showing posts with label Glitz Design Digital. Show all posts

Tuesday, October 2, 2012

Whooo's ready to Party with Glitz Design

Happy October sweet friends!!!  I am having a hard time believing October is here with the warm temperatures we've been experiencing in southwestern Montana!  Good thing the challenge this month is to create Halloween goodies with Glitz Design!!!  Halloween will be here before we know it!!  I really don't have much in the way of Halloween supplies, so I had to get really creative with this month's projects!!  I grabbed some of Glitz Designs Love Games papers, Hoopla Digital Elements, and Pink Paislee's Vintage Moon Stamps and had a blast!!  Whooo's ready to party??
I made a fun little card and goodie pocket using some hexagon dies, leaf dies and a cute little owl from Pink Paislee that I've had in my stash for years.

I die cut the pocket out of patterned paper and decorated a label tag with the owl and some die cut leaves and a scary little spider:
I filled the little pocket with some Reeses pieces for fun:
I decorated another tag and layered it onto a card base filled with hexagon die cuts:
I stamped the orange panel with a background stamp from the Laced with Grace clear stamps and I also stamped a ticket from the same set of stamps and layered the owl on top.
Three of the hexagons are layered with dimensional adhesive to add visual interest.
I'm most excited about the wall art I created for this project!!! I used a little tag from the Hoopla Digital Element Kit, resized it, and colored it in Photoshop Elements, and came up with this:
Way fun and oh so easy!!!  It's so fun, it makes me wanna do a little dance!!! I die cut the bat and numbers and added the little flower and banner I created in PSE.  Last but certainly not least, every party needs a little food and I found this cute little cupcake idea on Pinterest and thought it would be the perfect addition to my little party!!
Aren't they the cutest little owls.  All you need is oreo cookies, Reeses Pieces, and frosted cupcakes!

I hope you enjoyed my little party and I hope this post inspires you to create a fun little get together with all the trimmings!!!

Supplies Used:
Glitz Design  Love Games Patterned Paper:  Stripe, Polka, Score Card, Damask
Glitz Design Laced with Grace Stamps
Glitz Designs Hoopla Digital Kit
Other Supplies:  PTI Rustic Cream and True Black Cardstock and ribbon; PTI Happy Hexagon, By the Numbers and Seed Packet Dies; PTI Friendship Jar Fall Fillers Stamps; Prickley Pear Leaf Die; Pink Paislee Vintage Moon Clear Stamps; Scrap Casual and tXT Abrasive fonts from dafont;

Thanks for stopping by!!!
Wishing you a very Glitzy Day,
Kristii

Tuesday, September 18, 2012

Grateful Harvest with Glitz Design

Hi there dear friends!!  I hope you are enjoying these beautiful fall days! The cooler temperatures are divine and we are getting ready to head to Yellowstone National Park to view the goreous fall colors!! With all the fall goodness in the air, I just couldn't help but make more fall goodies with Glitz Design!!  Today's post features many different items from several different lines just to shake things up a bit!!

The first card features a digital frame from the Pretty In Pink digital elements kit.  It just love the detail in the frame!  It's just plain gorgeous!
 I used the 6x6 Glitz Design Happy Travels paper pad to stamp the pumpkins and then I fussy cut them out.  I die cut the water can using the Happy Travels polka paper.  The tops of the pumpkin were fussy cut from Glitz Design Laced with Grace Stripe papers.
 I added a little lace, seam binding ribbon and a button to embellish!

Supplies used:
Glitz Design Happy Travels Digital Elements
Glitz Design Happy Travels 6x6 Paper Pad
Glitz Design Happy Travels Polka Paper
Other supplies:  Papertrey Ink Rustic Cream Cardstock; Papertrey Ink Garden Variety and Garden Variety II stamps and dies; Papertrey Ink Love Lives Here dies; Papertrey Ink Friendship Jar Fall Fillers;  Hand-Dyed Seam Binding Ribbon;  Lace and button from my stash.

The second card is an eclectic mix of Glitz Goodies!  I used the back side of Glitz Design Happy Travels Polka Paper for the base of this card.
I used the typewriter stamp from Glitz Design's Vintage Blue Stamp set and the leaf is die cut from the back-side of Glitz Design's Beautiful Dreamer Polka Paper.  I added some burlap for texture and buttons to add to the shabby chic feel!  I also added a little pumpkin stamped from Glitz Design's Happy Travels 6x6 Paper Pad and Laced with Grace stripe paper.  I also used my favorite seam binding ribbon and twine to embellish.

Supplies Used:
Glitz Design Happy Travels Polka Paper
Glitz Design Beautiful Dreamer Polka Paper
Glitz Design Vintage Blue Stamps
Other Supplies:  Burlap; Twine, Papertrey Ink Rustic Cream Cardstock; Papertrey Ink Gratitude Journal Stamps; Papertrey Ink Friendship Jar Fall Fillers Stamps; Buttons and Seam binding from my stash.

Thanks so much for stopping by!!
Wishing you a very Glitzy Day!!
Kristii

Saturday, September 8, 2012

Step by Step Saturdays with Glitz Design!!

Happy Saturday sweet friends!!!  Today's post is all about using what you have around the house to create seasonal decorations!

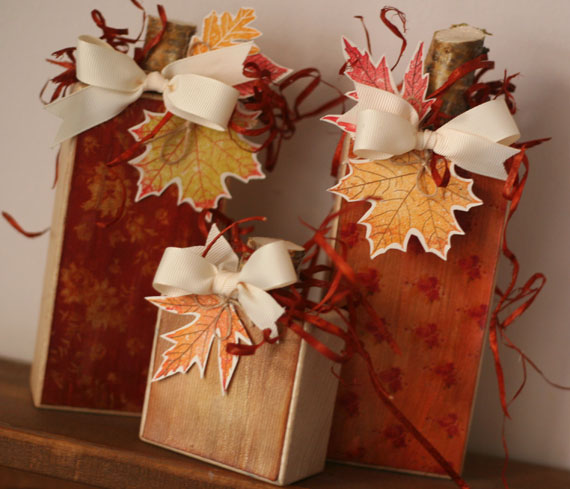
I have a whole box of blocks that have been sitting around waiting for grand kids to play with them.  Since grand kids aren't in our near future, I'm going to use the blocks to create some fun seasonal decorations.  The blocks started out like this:
I used Glitz Design's Happy Travels Digital Papers Kit for this project. They are some of my all time favorite papers and now that they've gone digital, there are so many more possibilities.
I used Photoshop Elements to add an orange tint to the papers:

  1. Click Enhance
  2. Click Adjust Color 
  3. Move the hue slider to the right until you find the color you're looking for
  4. Resize the paper to 6x6
  5. Print 

After printing the papers, I trimmed them slightly smaller than the blocks.  I brushed Tim Holtz' Rock Candy Distress Crackle Paint onto each of the papers and allowed them to dry.  After the papers were dry, I ran an embossing gun over the dried papers just to flatten each out so they would be smooth and ready to glue to the blocks.  Then I worked distress ink into the cracks to make them stand out a bit more.
I glued the papers to the blocks with Zip Dry, so that I could remove the papers from the blocks easily (just in case I want to use the blocks for the next holiday or if grandchildren are on the way...a  girl can always dream....lol!!!)
 
I embellished each pumpkin with some stamped leaves, ribbon, twine and some rust colored Excelsior.
My sweet hubby cut a tree branch into 1 - 2 inch pieces for the pumpkin stems and I just love the look!
Such a fast and easy way to make fun seasonal decorations!  I hope I've inspired you to create a seasonal project using items from around your house!! It's fun and economical too!!

Supplies Used:
Glitz Design Happy Travels Digital Paper Kit
Other supplies: Wood Blocks; Papertrey Ink Leaf Prints Stamp Set; Papertrey Ink Rustic Cream Cardstock and Ribbon; Tree Branch; Tim Holtz Distress Ink, Papertrey Ink Pure Poppy and Harvest Gold Ink; Excelsior

Thanks for stopping by!!!
Wishing you a very Glitzy Day!!!
Kristii

Tuesday, July 17, 2012

Pretty In Pink Gift Set With Glitz Design

Good morning sweet friends!!  I've been having lots of fun with Glitz Design Digital Goodies and today I have a fun little journal and card gift set to share with you!

Both projects feature the ledger paper from the Pretty in Pink Digital Paper Pack.  I think the ledger paper is my favorite out of all the papers in the Winter Lines.   You will find the sweet little bird cage in the French Kiss Digital Element Pack.  I added a little more pink to the birdcage using Photoshop Elements so that it would match the Pretty Ink Pink paper.  I printed out the birdcage three times and fussy cut one of the images.  I fussy cut the flowers from the second image to add a layer giving the image a little dimension.  The third image was die cut using Papertrey Ink's Hexagon Cover plate to add some floral embellishments to the hexagon pattern.

I used the Pretty In Pink 6x6 paper pad to cut some more hexagons, inked them and then adhered the pieces to the base of the card.  I resized the Pretty In Pink Title element and made it a little smaller so I could die cut a Double Ended Banner for the sentiment.
\
The journal adds Pretty In Pink Digital Elements Flowers and Frame 3 to the pretty pink background.  I enlarged the birdcage and printed it twice.  I fussy cut the bird cage from one and the flowers from the other.  
 
I typed the quote, "I feel like a tiny bird, with a great big song",  on Word using the KG Strawberry Limeade font.  I inked the edges and hand cut the banner ends.  I added some seam binding ribbon and hand made flowers to embellish.

Supplies Used:
Glitz Design Pretty In Pink 6x6 Paper Pad
Glitz Design Digital Pretty In Pink Papers:   Ledger
Glitz Design Digital Pretty In Pink Elements:  Frame 3 and Flowers
Glitz Design Digital French Kiss Elements:  Whatnots 4

Thanks for stopping by!!!
I wish you a very Glitzy Day!!
Kristii

Tuesday, July 3, 2012

Summer Fun with Glitz Design

Happy July 3rd everyone!!  Wow!  I can hardly believe that tomorrow is the fourth of July! Summer is going by at record speed and I want to slow down and enjoy each and every minute.  If the winters weren't so long here in Montana, I might think differently, that's for sure!  For now, I will enjoy the nice long days and the warm weather that summer brings!   This month's challenge for Glitz Design fits right into the summer theme!!
Here's the challenge:
and here's my take on the Summer Fun Challenge:
I am so excited that Glitz Design has gone digital!!!!  Digital elements give you so many more choices in the creative process!  You can change the size and the color.  You can layer the elements or you can print the elements and fussy cut them like me!  I love the whole idea of digital projects, but I love to touch and feel my work!  If I can't touch it, it just isn't the same for me.  So, rather than going just digital, I choose the hybrid alternative and combine the tools and techniques of both digital and traditional papercrafting.

In my first project I opened up the Pretty In Pink Ledger Paper in Photoshop Elements:

I used the crop tool to resize the paper to 8x10 and then I added the frame and flowers from the Pretty in Pink element kit.  I resized the elements to fit the 8x10 base and made the frame more oval than round.
I decided I didn't want a pink background in this piece after I loaded the frame and flowers.  I switched back to the background layer so I could change the color of the background.  Then,  I clicked enhance, adjust color...
then moved the hue tool to the left to create the pretty aqua color.  So easy and very effective!  I still have the ledger theme, just in a different color that will go with the colors in my living room.
Next, I opened an element from the French Kiss collection and resized it and printed it out twice.   The first image I cut out the bird house and the second image I just cut out the bees.
I sized it to fit right inside the frame as shown.  I used an exacto knife to slit the background layer so the birdhouse would tuck right inside.
I fussy cut the bees and adhered them with dimensional adhesive.  I love the little pop they give the project!!  I typed the sentiment on the computer using the KG Strawberry Limeade font. I love that font!!!  You can download your own copy of this font on www.dafont.com.  I inked each line of the sentiment  and adhered them with dimensional adhesive.  Don't you just love that digital frame!!  I looks like you can reach out and touch it in real life!!
For the banner, I loaded a Pretty In Pink Elements Paper Layer into PSE and lightened it.  I typed the letters using the EasyOpenFace font and then printed the sheet.
I punched each letter out with an EK Success punch and inked each one.  I glued them to a piece of twine and glued the twine to the frame.
I also stamped a little set of bees from Rhonna Farrer's Follow Your Heart Stamps by MME.  I had a blast making this project! It's one of my all time favorites!!

The little card was made using PSE too.  I used the same colored paper and printed out a 4 x 5 1/4 sheet.
I made the roses and bird house a little smaller in PSE and I framed the birdhouse with Papertrey Ink's Limitless Layers Square Dies. I punched the edge of the printed paper and added some lace and a pearl. The sentiment was printed on the computer using the KG Strawberry Limeade font.

Supplies Used:
Glitz Design Pretty In Pink Digital Papers:  Ledger
Glitz Design Pretty in Pink Digital Elements: Flowers, Frame 3, Paper Layer 4
Glitz Design French Kiss Digital Elements:  Whatnnots 9
You can find Glitz Design Digital goodies at http://www.jessicasprague.com/

I hope you get a chance to work with Glitz Design Digital goodies!  I totally had the best time ever playing with all the possibilities!!

Thanks for stopping by and I wish you a very Glitzy Day!!!
Kristii