Saturday, November 24, 2012

Step by Step Saturday with Glitz Design

Happy Saturday dear friends!!  It's time for a new Step by Step Saturday post, and since Thanksgiving has come and gone, I think it's time to start thinking about Christmas!! Today, I have a quick and easy snowman card and matching ornament made using Glitz Design's Hello Friend 6x6 paper pad.
The idea for this little card and ornament set started with Glitz Design's Hello Friend Envelope paper from the 6x6 pad.  I am totally in love with the postal border and the beautiful roses in the corner!!
Step 1. Cut a piece of white cardstock to 4 1/4" x 11" and fold in half.  Place the die on the cardstock lining up the line on the die with the edge of the paper and run through your die cut machine to create the card base.
Step 2.  Die Cut three snowmen from the Envelope paper strategically placing the rose in the bottom, right corner of the die. Then, cut one snowman out of chipboard for the ornament base.  Glue one of the die cut patterned papers to the front of the card base and glue the other two patterned paper cuts to the front and back of the ornament to cover.
Step 3.  Embellish the front of your card with a hat, arms and mittens.
Step 4.  Stamp the face and color.
Step 5.  Add ribbon, flowers, pearls, punched greenery, and stamped sentiment.
Step 6.  Decorate the front of the ornament as desired making sure to cut out two hats and four mittens to embellish the back side of the ornament as well.  When attaching the hat, add a knotted piece of twine to hang.  Decorate the back of your ornament as desired.

Supplies Used:
Glitz Design Hello Friend 6x6 Paper Pad
Chipboard
Papertrey Ink Stamper's Select White Cardstock, twine and Cream Felt
Papertrey Ink Shape Up Dies and Stamps: Snowman
McGill Greenery Punch
Roses, ribbon, buttons and pearls from my stash

Thanks for stopping by and I wish you a very Glitzy day!!
Kristii

Tuesday, November 20, 2012

So Grateful with Glitz Design

Happy Thanksgiving week sweet friends!  We've been celebrating gratefulness at Glitz Design this month and I thought I'd add a little pink goodness to the celebration!  There's nothing like getting out of the box and creating something totally unexpected!!  I am usually a very traditional person, so creating a pink Thanksgiving card was a lot of fun and totally off the wall!  I do have to say, thought, I'm kind of loving it!!
I used Glitz Design's Hello Friend 6x6 paper pad and a Whatnots frame for the inspiration for this card.  Love, love, love the colors of these papers and embellishments!  I layered the backside of the Clouds paper onto a white card base, and then I layered the Clouds paper underneath the Whatnot frame and glued the frame onto the card base.  Next, I stamped the leaves onto white paper and cut them out.  I die cut two rustic cream felt acorns and then I die cut two more acorns using white paper covered with Hello Friend tapes.  The tapes make a great contrasting top on the acorns!  I added some ribbon, a grateful tag, and a Happy Thanksgiving tag to embellish the card.
The next card celebrates friendship.  I am so grateful for my friends and I need to make sure they know how much I care about them, so I think this card is perfect for this month's theme!
One again, I used Hello Friend papers and embellies.  I am so loving the new tapes!  They are definitely a new favorite for sure!!  I stamped the Hero Arts Musical Walk onto the Clouds paper and covered it with a sweet circular Peek a Boo.  I added a stamped border on the bottom third of the white cardstock and added two layers of patterned paper from the 6x6 Hello Friend Pad.  I made some banners using the sweet Coral Polka Tape.  I added a little birdie from the Hello Friend Paper Garland to embellish the banner.  I love the garland so much, I am using it sparingly so I don't run out too quickly!!  I just love adding a little bit here and there!  I added a stamped butterfly, Puffy Word Stickers, hand dyed seam binding, and some little rolled flowers to embellish.

Supplies Used:
Glitz Design Hello Friend 6x6 Pad
Glitz Design Hello Friend Patterened Paper:  Clouds
Glitz Design Hello Friend Whatnots
Glitz Design Hello Friend Peek A Boos
Glitz Design Hello Friend Puffy Word Stickers
Glitz Design Hello Friend Rubber Stamps
Glitz Design Hello Friend Paper Garland
Glitz Design Hello Friend Tapes

Other Supplies:  PTI Stamper's Select White Cardstock; PTI Rustic Cream Felt: PTI Gratitude Journal Stamps; PTI Kraft, Berry Sorbet, Fine Linen, and Dark Chocolate Ink. Hand Dyed Seam Binding, PTI Autumn Acorn Stamps and Pearl

Thank you so much for stopping by and I wish you a very blessed Thanksgiving!
Kristii

Sunday, November 18, 2012

Pumpkin Chocolate Chip Cookies

Hi there sweet friends!  It's hard to believe that Thanksgiving is just a few days away!  This fall has gone by so quickly and I'm sure those of you who are well acquainted with me, know that I'm ready to start putting out Christmas decorations and begin my Christmas baking!  I love everything about the Christmas season!!  Just so you know, I've already started on my 12 Days of Christmas posts and I can't wait to start sharing those with you!!  Since it's a little early to be in Christmas mode, however, I thought I would share one of my favorite fall recipes with you, Pumpkin Chocolate Chip Cookies.    I make these cookies regularly throughout the fall season and my family just loves them!!  I hope you enjoy them as much as we do!!  This recipe will go in my own copy of my Family Favorites Cookbooks that I created over the summer break.  I still have a cookbook that is available in my Etsy store and I have plans for a new design coming in the next several days.  Enjoy!!

Pumpkin Chocolate Chip Cookies

Ingredients:
1/2 c. butter
1 1/2 c. brown sugar, packed
2 eggs
1 c. pumpkin
1 tsp. vanilla
2 1/2 c. flour
3 tsp. baking powder
1 tsp. salt
1 1/2 tsp. pumpkin pie spice
1/4 tsp. ginger
1 c. chocolate chips

Cream butter and sugar together until fluffy.  Beat in eggs.  Stir in pumpkin and vanilla.  Blend in half the flour and add baking powder and spices.  Stir in the rest of the flour.  Drop by tablespoonfuls onto baking sheet.  Bake at 375 for 12-14 minutes.  Makes 2 1/2 dozen.

Thank you so much for stopping by!!! I hope you have a wonderful Monday!!
Kristii

Tuesday, November 6, 2012

A Grateful Heart with Glitz Design

Hi there Glitzy friends!!  I don't know about you, but for me, November brings a season of gratefulness.  So often the days fly by and the hustle and bustle of life is so crazy that I forget to take time to appreciate all that I have.  I have so much to be thankful for and I decided that I should keep record of my heart's deepest gratitude and thankfulness in a custom-made shabby chic Gratitude Journal.
I used a genuine Moleskine Journal and Glitz Design's Hello Friend Papers, Stamps and Embellies to create this sweet little journal that's full of shabby chic goodness and lots of little surprises.
The inside cover has a little pocket that holds two little stamped tags.  The first five pages of the journal are numbered with sweet little embellishments and grateful sayings.
I left lots of room on each page to record all my grateful thoughts and feelings.
 I do want to make sure that I am grateful each and every day!  It's so important I feel remembering what you're grateful for keeps you grounded and I'm certain it's the secret of true happiness!
 Having an attitude of gratitude is definitely a choice I want to make every moment of every day!
Count your many blessings....
 name them one by one....
I even added a traditional Thanksgiving Hymn to the journal!  I love my vintage hymnal!!
The back pocket of the journal is covered with a Hello Friend Journaling Sticker and is ready for my little bits of ephemera to add to the spirit of gratefulness.

I also added some of Glitz Design's Hello Friend Paper Layers in between the pages to add character and shabby chic goodness to the journal.  Sooo fun!  Glitz Design Paper Layers are always a favorite of mine!!
I also made a little matching card to go along with the journal in case I want to give it away as a gift:
I ran some kraft cardstock through the crimper and painted the edges with an acrylic paint dabber.  I added some Glitz Design Crepe Trim and Prima lace to the edge.  I embellished with layered stickers, stamped butterflies and some little banner elements.
The  sentiment was stamped and I cut the ends to resemble a banner and added some seam binding trim.  Very shabby chic and so fun to make!! I love Glitz Design!!

Supplies Used:
Glitz Design Hello Friend 6x6 Paper Pad
Glitz Design Hello Friend Layered Stickers
Glitz Design Hello Friend Title Stickers
Glitz Design Hello Friend Paper Layers
Glitz Design Hello Friend Giant Rhinestones
Glitz Design Hello Friend Paper Garland
Glitz Design Hello Friend Rubber Stamps
Glitz Design Hello Friend Puffy Word
Glitz Design Hello Friend Whatnots
Glitz Design Hello Friend Crepe Trim
Glitz Design Hello Friend Tape
Glitz Design Teeny Alphas Coral

Other Supplies:  Papertrey Ink Gratitude Journal Stamps; Papertrey Ink Kraft and Rustic Cream Cardstock and ribbon; Papertrey Ink Berry Sorbet Ink and Ribbon; Papertrey Ink Melon Berry, Rustic Cream and Simply Chartreuse Felt; Prima Lace; Hand Dyed Seam Binding; 

Thanks for stopping by and I wish you a very Glitzy Day!!!
Kristii

Tuesday, October 16, 2012

Fast and Easy Halloween Cards with Glitz Design

Hi again dear friends!! It's time for another Glitz Design post!!  I don't know about you, but I have a few  Glitz Design patterned paper scraps that need to be used up.  This month's challenge is to make Halloween goodies and I want to take the challenge a step further and encourage you to use your scraps!

In my first card for today I found some of my favorite Afternoon Muse and Laced with Grace papers and made a sweet little Jack O Lantern with them:
I die cut the pumpkin sections and cut around the edge of the negative image.  I layered the negative image over the Afternoon Muse Polka paper and I love how it looks!  Polka Dot pumpkins totally make me smile!!  I adhered the eyes and mouth with dimensional adhesive to give his face a little pop!  I used some leaf stamps and a Tim Holtz Bird stamp to add some dimension and variety to the card!! Don't you just love the music notes on the bird?  Sigh....so perfect!!
Supplies Used:
Glitz Design Afternoon Music Polka Patterned Paper
Glitz Design Laced with Grace Polka Patterned Paper
Other Supplies:  PTI Rustic Cream and True Black Cardstock; PTI Leaf Prints Stamps; PTI On the Farm Stamps; Tim Holtz Artful Flight Stamps; PTI Orange Zest Ribbon

In the next card I used an acrylic card base.  I love creating layers with acrylic card bases!!  The dimension you can achieve is absolutely amazing!!
I layered a rustic cream panel on top of a black panel and adhered the layered panels to the inside of the card.  I cut a slightly smaller Vintage Blue Floral Panel and adhered a circle punched from Dance in Sunshine Polka paper, stamped the sentiment, and adhered them to the inside of the card front along with a scary punched fence and pumpkin.  The layered effect is fabulous!!!

On the face of the card I adhered a die cut tree, a bird and pumpkin that were painted with Clear Rock Candy Crackle Paint.  I added a bow just for fun.  Such a quick and easy card and so very effective!!

Supplies Used:
Glitz Design Dance In Sunshine Polka Patterned Paper
Glitz Design Vintage Blue Floral Patterned Paper
Glitz Design Love Games Polka Paper
Other Supplies: Clear Acrylic; Tim Holtz Branch Tree; Tim Holtz Artful Flight Stamps; PTI Friendship Jar Fall Fillers Stamps; Prickley Pear Leaf die; Martha Stewart Fence Punch; PTI Rustic Cream and True Black Paper; PTI Simply Chartreuse Felt;

I hope I've encouraged you to get creative with your card scraps.  Mix and Match them and have some fun!!!

Wishing you a Glitzy Day,
Kristii

Tuesday, October 2, 2012

Whooo's ready to Party with Glitz Design

Happy October sweet friends!!!  I am having a hard time believing October is here with the warm temperatures we've been experiencing in southwestern Montana!  Good thing the challenge this month is to create Halloween goodies with Glitz Design!!!  Halloween will be here before we know it!!  I really don't have much in the way of Halloween supplies, so I had to get really creative with this month's projects!!  I grabbed some of Glitz Designs Love Games papers, Hoopla Digital Elements, and Pink Paislee's Vintage Moon Stamps and had a blast!!  Whooo's ready to party??
I made a fun little card and goodie pocket using some hexagon dies, leaf dies and a cute little owl from Pink Paislee that I've had in my stash for years.

I die cut the pocket out of patterned paper and decorated a label tag with the owl and some die cut leaves and a scary little spider:
I filled the little pocket with some Reeses pieces for fun:
I decorated another tag and layered it onto a card base filled with hexagon die cuts:
I stamped the orange panel with a background stamp from the Laced with Grace clear stamps and I also stamped a ticket from the same set of stamps and layered the owl on top.
Three of the hexagons are layered with dimensional adhesive to add visual interest.
I'm most excited about the wall art I created for this project!!! I used a little tag from the Hoopla Digital Element Kit, resized it, and colored it in Photoshop Elements, and came up with this:
Way fun and oh so easy!!!  It's so fun, it makes me wanna do a little dance!!! I die cut the bat and numbers and added the little flower and banner I created in PSE.  Last but certainly not least, every party needs a little food and I found this cute little cupcake idea on Pinterest and thought it would be the perfect addition to my little party!!
Aren't they the cutest little owls.  All you need is oreo cookies, Reeses Pieces, and frosted cupcakes!

I hope you enjoyed my little party and I hope this post inspires you to create a fun little get together with all the trimmings!!!

Supplies Used:
Glitz Design  Love Games Patterned Paper:  Stripe, Polka, Score Card, Damask
Glitz Design Laced with Grace Stamps
Glitz Designs Hoopla Digital Kit
Other Supplies:  PTI Rustic Cream and True Black Cardstock and ribbon; PTI Happy Hexagon, By the Numbers and Seed Packet Dies; PTI Friendship Jar Fall Fillers Stamps; Prickley Pear Leaf Die; Pink Paislee Vintage Moon Clear Stamps; Scrap Casual and tXT Abrasive fonts from dafont;

Thanks for stopping by!!!
Wishing you a very Glitzy Day,
Kristii

Tuesday, September 18, 2012

Grateful Harvest with Glitz Design

Hi there dear friends!!  I hope you are enjoying these beautiful fall days! The cooler temperatures are divine and we are getting ready to head to Yellowstone National Park to view the goreous fall colors!! With all the fall goodness in the air, I just couldn't help but make more fall goodies with Glitz Design!!  Today's post features many different items from several different lines just to shake things up a bit!!

The first card features a digital frame from the Pretty In Pink digital elements kit.  It just love the detail in the frame!  It's just plain gorgeous!
 I used the 6x6 Glitz Design Happy Travels paper pad to stamp the pumpkins and then I fussy cut them out.  I die cut the water can using the Happy Travels polka paper.  The tops of the pumpkin were fussy cut from Glitz Design Laced with Grace Stripe papers.
 I added a little lace, seam binding ribbon and a button to embellish!

Supplies used:
Glitz Design Happy Travels Digital Elements
Glitz Design Happy Travels 6x6 Paper Pad
Glitz Design Happy Travels Polka Paper
Other supplies:  Papertrey Ink Rustic Cream Cardstock; Papertrey Ink Garden Variety and Garden Variety II stamps and dies; Papertrey Ink Love Lives Here dies; Papertrey Ink Friendship Jar Fall Fillers;  Hand-Dyed Seam Binding Ribbon;  Lace and button from my stash.

The second card is an eclectic mix of Glitz Goodies!  I used the back side of Glitz Design Happy Travels Polka Paper for the base of this card.
I used the typewriter stamp from Glitz Design's Vintage Blue Stamp set and the leaf is die cut from the back-side of Glitz Design's Beautiful Dreamer Polka Paper.  I added some burlap for texture and buttons to add to the shabby chic feel!  I also added a little pumpkin stamped from Glitz Design's Happy Travels 6x6 Paper Pad and Laced with Grace stripe paper.  I also used my favorite seam binding ribbon and twine to embellish.

Supplies Used:
Glitz Design Happy Travels Polka Paper
Glitz Design Beautiful Dreamer Polka Paper
Glitz Design Vintage Blue Stamps
Other Supplies:  Burlap; Twine, Papertrey Ink Rustic Cream Cardstock; Papertrey Ink Gratitude Journal Stamps; Papertrey Ink Friendship Jar Fall Fillers Stamps; Buttons and Seam binding from my stash.

Thanks so much for stopping by!!
Wishing you a very Glitzy Day!!
Kristii

Thursday, September 13, 2012

Pink Persimmon Fun and More Pink Paislee Kits!!

Hi there dear friends!!  I've been working like crazy putting together some more Pink Paislee Kits for sale and I still have two more left!! If you were wanting one of these kits, head on over to my Etsy store and get yours before they are all gone forever!!
I've also been working on a second Pink Paislee kit featuring Pink Persimmon stamps for my dear sweet friend Lisa and here's one of the cards that I've made for the kit:
I just love Lisa Pace's Sweet Little Girls and paired with Pink Paislee's London Market Papers....well, the combination just makes me happy!!!
Thank you so much for stopping by!!!  I'll be back soon with more Glitz Design and Pink Persimmon goodness!!!  You are all the best and I appreicate you tremendously!!!
Kristii

Saturday, September 8, 2012

Step by Step Saturdays with Glitz Design!!

Happy Saturday sweet friends!!!  Today's post is all about using what you have around the house to create seasonal decorations!

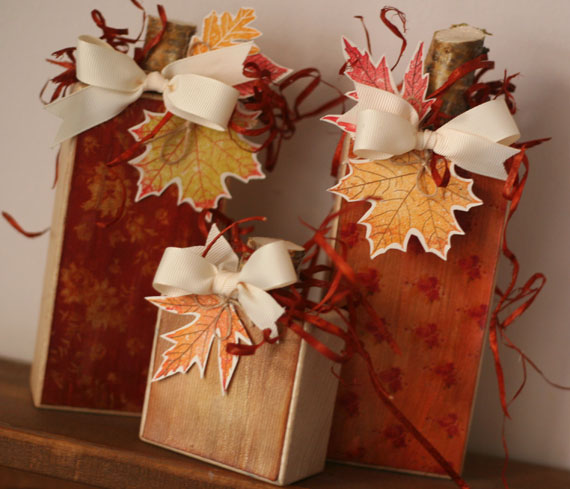
I have a whole box of blocks that have been sitting around waiting for grand kids to play with them.  Since grand kids aren't in our near future, I'm going to use the blocks to create some fun seasonal decorations.  The blocks started out like this:
I used Glitz Design's Happy Travels Digital Papers Kit for this project. They are some of my all time favorite papers and now that they've gone digital, there are so many more possibilities.
I used Photoshop Elements to add an orange tint to the papers:

  1. Click Enhance
  2. Click Adjust Color 
  3. Move the hue slider to the right until you find the color you're looking for
  4. Resize the paper to 6x6
  5. Print 

After printing the papers, I trimmed them slightly smaller than the blocks.  I brushed Tim Holtz' Rock Candy Distress Crackle Paint onto each of the papers and allowed them to dry.  After the papers were dry, I ran an embossing gun over the dried papers just to flatten each out so they would be smooth and ready to glue to the blocks.  Then I worked distress ink into the cracks to make them stand out a bit more.
I glued the papers to the blocks with Zip Dry, so that I could remove the papers from the blocks easily (just in case I want to use the blocks for the next holiday or if grandchildren are on the way...a  girl can always dream....lol!!!)
 
I embellished each pumpkin with some stamped leaves, ribbon, twine and some rust colored Excelsior.
My sweet hubby cut a tree branch into 1 - 2 inch pieces for the pumpkin stems and I just love the look!
Such a fast and easy way to make fun seasonal decorations!  I hope I've inspired you to create a seasonal project using items from around your house!! It's fun and economical too!!

Supplies Used:
Glitz Design Happy Travels Digital Paper Kit
Other supplies: Wood Blocks; Papertrey Ink Leaf Prints Stamp Set; Papertrey Ink Rustic Cream Cardstock and Ribbon; Tree Branch; Tim Holtz Distress Ink, Papertrey Ink Pure Poppy and Harvest Gold Ink; Excelsior

Thanks for stopping by!!!
Wishing you a very Glitzy Day!!!
Kristii

Tuesday, September 4, 2012

Celebrate Fall with Glitz Design

Happy September sweet friends!!  I'm so excited for fall and all the changes the season brings!!I decided to celebrate the change of seasons by making some fun, fall shaped cards!!

The first card uses a scalloped card created with the Glitz Designs Happy Travels line and the Wild Card Cricut Cartridge set at 4 3/4 inches.


I die cut several leaves from Happy Travels patterned papers and felt and layered them on top of a die cut doily. I also used some Glitzers from the Glitz Design Happy Travels collection. They add a little sparkle and a lot of fun to any little project!!  I printed out a sweet little bird from the Graphics Fairy and added him to the sweet little fall scene and added a little stamped double-ended banner for the sentiment.
I layered the paper leaves and felt leaves and stitched them together with a long stitch.  I folded the leaves to add some texture and fun to the card.

Supplies Used:
Glitz Design Happy Travels 6x6 Paper Pad
Glitz Design Happy Travels Glitzer
Other Supplies:  Papertrey Ink Rustic Cream Cardstock, Ribbon and Felt; Papertrey Ink Parisian Lace Doily Die; Prickley Pear Fall Leaves Dies; Bird Graphic from the Graphics Fairy

In my second card I used the Glitz Design French Kiss line along with the Shape-Up Series Pumpkin Die by Papertrey Ink.
I die cut the back of the French Kiss Stripe paper using Papertrey Ink Pumpkin Sections, and I die cut the base of the pumpkin using the French Kiss Floral paper.  I really liked the negative image from the sections , so I used that image instead.  I die cut several leaves and rolled a felt flower to embellish.
Supplies used:
Glitz Design French Kiss Floral Patterned Paper
Glitz Design French Kiss Stripe Patterned Paper
Other Supplies:  Papertrey Ink Rustic Cream Cardstock, felt and twine; Papertrey Ink Melon Berry Felt, Papertrey Ink Autumn Acorns Stamp Set; Hand Dyed Seam Binding; Recollections Pearl

Thanks for stopping by and I wish you a very Glitzy Day!