Monday, July 30, 2012

More Cookbook Fun!!!

Happy Monday dear friends!!!  I'm so excited to share a brand new cookbook cover design for my cookbook series featuring Papertrey Ink's Strawberry Patch Stamps and Dies!!  
The cover begins with layers of black white and Pure Poppy Patterned Paper.  I think the Pure Poppy bitty dot patterned paper is one of my all time favorites!!  It's beautiful!!!  I die cut several strawberries and leaves and layered them onto a kraft Berry Basket die cut layered with a sweet little doily.  I added a filigree border on the top and bottom and a red gingham ribbon....another one of my favs!!  Here's a peek at the inside:
The inside contains a sweet little pocket page for notes and 10 dividers-3 of which are blank.
The spine is decorated with the bitty dot paper and the title is stamped with "Garden Fresh"  found in the Friendship Jar stamp set.
I am enjoying these cookbooks so much!! They are going to make great Christmas Gifts for sure!!
Supplies used:
Papertrey Ink Stamps and Dies:  Strawberry Patch, Berry Basket, Friendship Jar, Block Alphabet, Filigree Border
Papertrey Ink Cardstock and Ink:  Pure Poppy, Simply Chartruese, True Black, Stamper's Select White, Kraft, Sweet Blush
Papertrey Ink Patterned Paper:  Pure Poppy and Simply Chartreuse
Papertrey Ink Kraft Binder

I have a fun little recipe that I found on myrecipes.com will be added to my own cookbook to share with you!

Sweet and Spicy Citrus Tilapia


Ingredients


4 (6-ounce) tilapia fillets
Cooking spray
1/2 cup fresh orange juice (about 1 orange)
3 tablespoons fresh lime juice
1 tablespoon brown sugar
1 tablespoon extra-virgin olive oil
2 teaspoons lower-sodium soy sauce
1/2 teaspoon salt
1/2 teaspoon ground cumin
1/4 teaspoon black pepper
1/4 teaspoon ground red pepper
2 garlic cloves, crushed
1/2 teaspoon paprika

Preparation

1. Arrange fish in a single layer in a shallow roasting pan coated with cooking spray. Combine orange juice and next 9 ingredients (through garlic); pour over fish. Let stand 15 minutes.
2. Preheat broiler.
3. Sprinkle fish with paprika; broil 15 minutes or until desired degree of doneness. Drizzle sauce over fish.
Such an easy recipe filled with flavor and oh so good for you!!!!  We cook ours on the grill so we don't have to cook over a hot stove or oven and it makes the perfect summer dinner!!
Thanks for stopping by!!
Happy cooking,
Kristii


    Friday, July 27, 2012

    Stamp A Faire 2012 Continued

    Happy Friday beautiful friends!! I am so far behind, but I've had a blast continuing on with my Stamp-a-faire projects! Here's the challenge:

    The-Challenge
    Your challenge is to pick one of the mini books from below and utilize it in a project of your own.  You can re-create an exact replica of the designer's project or reinterpret it in your own way.


    I chose to make Melissa's Mini Book using the Library Card Die and mini Library Pockets. Squeal....What a cute little project! I still can't contain my excitement over this project and I just have to say, I loved it so much I just had to make two of them!!!  My heart is so happy after creating these two projects!! They were just the therapy I needed!!

    Here's a close-up of the first one:
    I thought it would be fun to make one of these little mini tag books with strawberries using Papertrey Ink's Strawberry Patch Stamps and Dies!! The Papertrey Ink Patterned papers worked beautifully with this project!!
    I also used the School Time Stamps, Movers and Shakers Sentiments and We Go Together sentiments too.  Way fun!!
    and here's my second take on the challenge:
    I used Pink Paislee London Market papers with the second book and I totally love the Shabby Chic feel of it!!
    I used my new favorite stamp set Life is Sweet to decorate the pages in this sweet little mini!!!  What a wonderful stamp set!  I just can't get over how sweet these roses are!! They are so fun to use!

    Supplies Used:
    Papertrey Ink Cardstock:  Rustic Cream, Pure Poppy, Kraft, Aqua Mist
    Papertrey Ink Patterned Papers:  Simply Chartreuse and Pure Poppy
    Papertrey Ink Dies:  Notched Flower, Simply You, Library Card, Mini Library Pocket, Beautiful Blooms 1 & 2, Spiral Notebook Page, Fillable Frames #9, Filigree Border Die
    Papertrey Ink Felt:  Simply Chartreuse, Fine Linen, Vintage Cream, Pure Poppy
    Papertrey Ink: Pure Poppy, Sweet Blush, Simply Chartreuse, Spring Moss, Hibiscus Burst
    Papertrey Ink Ribbon: Simply Chartreuse Grograin, Hibiscus Burst Grosgrain, Vintage Cream Grograin
    Pink Paislee 6x6 London Market Paper Pad
    Buttons from my stash

    Thanks for stopping by!!!  I appreciate you all!!
    Kristii

    Wednesday, July 25, 2012

    Papertrey Ink July Blog Hop

    Hi there sweet friends!!!  I'm so excited this morning!! I actually had time to work on a card for the Papertrey Ink Blog Hop!!  Whoooo Hooo!  This month's blog hop focuses on beautiful summer colors!  Who can resist a summery challenge?  Not me, that's for sure!! I love everything about summer!!  I just wish it wouldn't go by so fast!  Anyway, I better get on to the challenge:

    The-Challenge
    Blog-hop-inspiration
    This month's inspiration is all about pairing up beautiful summer colors as this wonderful season begins to come to a close.  Put together some citrusy hues along with some pretty floral images to create the perfect project that embodies everything summer.  We look forward to seeing your creations!
    and here's my take on the challenge:

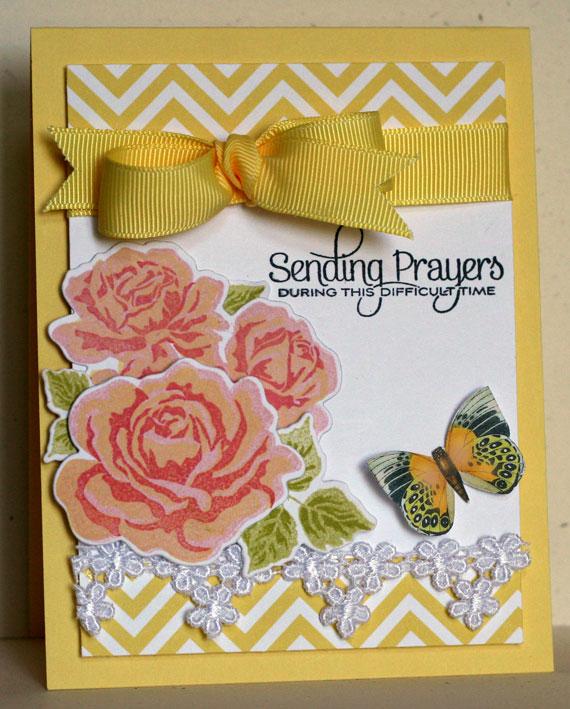
    I used my new favorite set, The Sweet Life, for this card!!  This set is appropriate for any type of card you need to make!  I am finding myself turning to it constantly these days!!  I used Sweet Blush, Lemon Tart, and Berry Sorbet ink to create the roses and Simply Chartreuse and Spring Moss to create the leaves.  The Butterfly comes from Rhonna Farrer digital kits
    Supplies Used:


    Papertrey Inks: Spring Moss, Simply Chartreuse, Sweet Blush, Lemon Tart, and Berry Sorbet.
    Papertrey Ink Papers: Stamper's Select White and Lemon Tart
    Chevron Paper: Free Printable from Mel Stampz
    Lace from my stash

    Thanks for stopping by!!
    Kristii

    Monday, July 23, 2012

    Stamp-a-faire Ribbon Techniques Challenge

    Happy Monday beautiful friends!!  I am so slow with getting my challenges done, but I will get them all finished just the same!!! I am sooooo excited to play with my new stamps, my heart is bursting with creative joy!!  Those of you who are kindred spirits will know what I mean!!
    The-Challenge
    Your challenge is to pick one of the ribbon techniques from below and utilize it in a project of your own.  You can re-create an exact replica of the designer's project or reinterpret it in your own way.


    Here's my take on the challenge using Melissa Phillips knotted ribbon leaf tutorial:
    I used Pink Paislee London Market Papers for the inspiration in this card.  London Market papers are my favorite papers from last season!  I paired the papers with Sweet Blush and Vintage Cream cardstock...my very favorite colors ever!!
    Supplies Used:
    Papertrey Ink Papers:  Vintage Cream and Sweet Blush Cardstock
    Papertrey Ink Dies:  Notched Flower, Heart Border, Beautiful Blooms II, Trendy Trees (Heart)
    Papertrey Ink Stamps:  Beautiful Butterflies (Sentiment)
    Papertrey Ink:  Smokey Shadow
    Pink Paislee 6x6 Paper Pad: London Market
    Tim Holtz Tea Dye Distress Ink

    Thanks for stopping by!!
    Even though the time has expired, I will continue to work on the Stamp-a-faire challenges!!
    See you soon,
    Kristii

    Sunday, July 22, 2012

    Opening Ceremony Make and Take

    Happy Sunday dear friends!! I am a little late getting my cards posted for Stamp a Faire, but better late then never!!!  I did get some happy mail this weekend and I was able to play with some new stamps for my challenges!!!  I am totally loving The Sweet Life Stamps!!! They were a little tricky to line up at first, but as I continued stamping with the stamps, I think I was getting the hang of it!!!
    Here's my card:
    The Sweet Life Stamps are 3-step stamps that add depth and dimension with each and every step!  I used Sweet Blush ink in the first step, Melon Berry Ink in the second step and Hibiscus Burst in the final step.  I really like how the roses turned out!
    You will be seeing me use these stamps all the time!!! I totally love them!!!

    Thanks for stopping by and I wish you a wonderful evening!!!
    Kristii

    Saturday, July 21, 2012

    Stamp A Faire 2012

    Good Morning from beautiful Southwestern Montana!!  It's 5:00 am here in Montana and the day looks to be absolutely gorgeous!!!  The coffee is brewed:

    and I'm ready to get started!!!!!!

    I am so excited for today's Stamp a Faire event!!  I tried to get something together here in Montana but it didn't pan out, so I'm here with my biggest supporter...my sweet hubby!!  My hubby and I have taken to hiking in the beautiful mountains that surround our valley and so I want to share some photos of this gorgeous state that I call home!
     This photo was taken in front of one of the 11 waterfalls that you will find as you hike to Hyalite Lake.  The trailhead is about 30 minutes from home!  We are so blessed here in Southwestern Montana.
     The wildflowers have been especially gorgeous this year!!! I was surprised to find that the paintbrush are a gorgeous shade of pink in the higher elevations!! Sooooo pretty!
     Here's another waterfall from the trail...
     The views were spectacular!!  The hike was 11 miles total with an elevation gain of 1900 ft....it was worth each and every step!!!
     Such a beautiful sight to see!!!
    Thanks for taking time to stop by and sharing in the beauty of Montana!! I wish you all a wonderful day and Happy Stamping!!!
    Kristii

    Thursday, July 19, 2012

    Case Study Challenge #100

    Good morning beautiful friends!!!  Today marks the 100th challenge over at Case Study!!!  Whooo hooo!! Congratulations!! Case Study is one of my favorite challenges and I couldn't be more thrilled to be their muse this month!!  This week's card is one of my favorites!  I went through a Little Bitty Bird streak when the stamps came out and it was fun to get them out once again!!!
    Here's the card Iwona chose:
    and here's my take:
    I love, love, love, the Little Bitty Bird Stamp Set by PTI and I added some elements from Little Bitty Bird additions.  I stamped the flower pot and flowers and then masked them off and added the fence.  Soooo fun!  The little birdies needed something new to perch on!!!
    I used Aqua Mist ink to ink up the flower pot stamp then I rock and rolled the inked stamp onto my classic kraft ink pad.  I just love that technique!  It makes solid images much more interesting for sure!
    I colored the birdies using Copic Markers in a simple blended technique...fast and oh so easy!!

    Supplies Used:
    Papertrey Ink Stamps:  Little Bitty Bird, Little Bitty Bird Additions, Garden Variety II, Nativity Silhouettes
    Papertrey Ink Paper:  Stamper's Select White, Pure Poppy Patterned Paper
    Papertrey Ink Dies:  Clouds, Little Bitty Bird, Lovely Layers
    MFT Dies: Mini Rolled Roses
    Papertrey Ink- Ink:  Harvest Gold, Pure Poppy, Hibiscus Burst, Hawaiian Shores, Enchanted Evening, Simply Chartreuse
    Papertrey Ink Simply Chartreuse Felt
    Papertrey Ink White Twill Ribbon
    Lace and Pearls from my Stash
    Copics:  R0000 Pink Beryl, R29 Lipstick Red

    Thanks for Stopping By!!!
    Kristii

    Tuesday, July 17, 2012

    Pretty In Pink Gift Set With Glitz Design

    Good morning sweet friends!!  I've been having lots of fun with Glitz Design Digital Goodies and today I have a fun little journal and card gift set to share with you!

    Both projects feature the ledger paper from the Pretty in Pink Digital Paper Pack.  I think the ledger paper is my favorite out of all the papers in the Winter Lines.   You will find the sweet little bird cage in the French Kiss Digital Element Pack.  I added a little more pink to the birdcage using Photoshop Elements so that it would match the Pretty Ink Pink paper.  I printed out the birdcage three times and fussy cut one of the images.  I fussy cut the flowers from the second image to add a layer giving the image a little dimension.  The third image was die cut using Papertrey Ink's Hexagon Cover plate to add some floral embellishments to the hexagon pattern.

    I used the Pretty In Pink 6x6 paper pad to cut some more hexagons, inked them and then adhered the pieces to the base of the card.  I resized the Pretty In Pink Title element and made it a little smaller so I could die cut a Double Ended Banner for the sentiment.
    \
    The journal adds Pretty In Pink Digital Elements Flowers and Frame 3 to the pretty pink background.  I enlarged the birdcage and printed it twice.  I fussy cut the bird cage from one and the flowers from the other.  
     
    I typed the quote, "I feel like a tiny bird, with a great big song",  on Word using the KG Strawberry Limeade font.  I inked the edges and hand cut the banner ends.  I added some seam binding ribbon and hand made flowers to embellish.

    Supplies Used:
    Glitz Design Pretty In Pink 6x6 Paper Pad
    Glitz Design Digital Pretty In Pink Papers:   Ledger
    Glitz Design Digital Pretty In Pink Elements:  Frame 3 and Flowers
    Glitz Design Digital French Kiss Elements:  Whatnots 4

    Thanks for stopping by!!!
    I wish you a very Glitzy Day!!
    Kristii

    Friday, July 6, 2012

    Make it Monday Challenge

    Happy Friday dear friends!! I hope you all had a very happy 4th of July!!  Our week has been absolutely fabulous! My dad visited from California, we hiked a good 10 miles during the week, spent some time with good friends, and yesterday had a girls day out!! Whew!  It truly was a fabulous week! I haven't had much time to create over the past several days, but I am busy making new cards for Farmer's Market!  Business has been very good and each week I've had to replenish my stock!! I am so very thankful for all of you who have purchased my goodies at the Farmer's Market and in my Etsy Store!!!  Thank you from the bottom of my heart!!

    Today I made a fun little birthday card using the Papertrey Ink  Make It Monday #73: Stamping on Patterned Paper and Retro Sketches #19.  

    Here's my take on the challenges:
    I used Pink Paislee's London Market 6x6 pad for this card.  I used the patterned paper with mostly text to die cut the butterflies and then I stamped each butterfly with sweet blush ink.  I inked each butterfly with Tim Holtz Tea Dye Distress Ink and adhered them to the card base and added a little pearl embellishment.  The pearls on the Lovely Layers Leaves were inspired from Melissa Phillips amazing card seen here.


    Supplies Used:
    Papertrey Ink Stamps and dies:  Love Lives Here, Filigree Border and Lovely Layers
    Papertrey Ink Cardstock:  Rustic Cream
    Patterned Paper:  Pink Paislee London Market 6x6 Pad
    Ink: PTI Sweet Blush Ink; Tim Holtz Tea Dye Distress Ink by Ranger
    PTI Simply Chartreuse Felt; Recollections pearls, Hand Dyed Seam Binding by MemrieMare
    KG Strawberry Limeade Font; PTI Button and Twine

    Note:  For those of you who are looking for new classes....I have been swamped with Farmer's Market and I am hoping to have some new classes up in the next week or two.  I am shooting for the second week of August.  Thanks for your patience!!

    I appreciate you taking time to stop by!!!!!
    Have a wonderful weekend!!
    Kristii

    Tuesday, July 3, 2012

    Summer Fun with Glitz Design

    Happy July 3rd everyone!!  Wow!  I can hardly believe that tomorrow is the fourth of July! Summer is going by at record speed and I want to slow down and enjoy each and every minute.  If the winters weren't so long here in Montana, I might think differently, that's for sure!  For now, I will enjoy the nice long days and the warm weather that summer brings!   This month's challenge for Glitz Design fits right into the summer theme!!
    Here's the challenge:
    and here's my take on the Summer Fun Challenge:
    I am so excited that Glitz Design has gone digital!!!!  Digital elements give you so many more choices in the creative process!  You can change the size and the color.  You can layer the elements or you can print the elements and fussy cut them like me!  I love the whole idea of digital projects, but I love to touch and feel my work!  If I can't touch it, it just isn't the same for me.  So, rather than going just digital, I choose the hybrid alternative and combine the tools and techniques of both digital and traditional papercrafting.

    In my first project I opened up the Pretty In Pink Ledger Paper in Photoshop Elements:

    I used the crop tool to resize the paper to 8x10 and then I added the frame and flowers from the Pretty in Pink element kit.  I resized the elements to fit the 8x10 base and made the frame more oval than round.
    I decided I didn't want a pink background in this piece after I loaded the frame and flowers.  I switched back to the background layer so I could change the color of the background.  Then,  I clicked enhance, adjust color...
    then moved the hue tool to the left to create the pretty aqua color.  So easy and very effective!  I still have the ledger theme, just in a different color that will go with the colors in my living room.
    Next, I opened an element from the French Kiss collection and resized it and printed it out twice.   The first image I cut out the bird house and the second image I just cut out the bees.
    I sized it to fit right inside the frame as shown.  I used an exacto knife to slit the background layer so the birdhouse would tuck right inside.
    I fussy cut the bees and adhered them with dimensional adhesive.  I love the little pop they give the project!!  I typed the sentiment on the computer using the KG Strawberry Limeade font. I love that font!!!  You can download your own copy of this font on www.dafont.com.  I inked each line of the sentiment  and adhered them with dimensional adhesive.  Don't you just love that digital frame!!  I looks like you can reach out and touch it in real life!!
    For the banner, I loaded a Pretty In Pink Elements Paper Layer into PSE and lightened it.  I typed the letters using the EasyOpenFace font and then printed the sheet.
    I punched each letter out with an EK Success punch and inked each one.  I glued them to a piece of twine and glued the twine to the frame.
    I also stamped a little set of bees from Rhonna Farrer's Follow Your Heart Stamps by MME.  I had a blast making this project! It's one of my all time favorites!!

    The little card was made using PSE too.  I used the same colored paper and printed out a 4 x 5 1/4 sheet.
    I made the roses and bird house a little smaller in PSE and I framed the birdhouse with Papertrey Ink's Limitless Layers Square Dies. I punched the edge of the printed paper and added some lace and a pearl. The sentiment was printed on the computer using the KG Strawberry Limeade font.

    Supplies Used:
    Glitz Design Pretty In Pink Digital Papers:  Ledger
    Glitz Design Pretty in Pink Digital Elements: Flowers, Frame 3, Paper Layer 4
    Glitz Design French Kiss Digital Elements:  Whatnnots 9
    You can find Glitz Design Digital goodies at http://www.jessicasprague.com/

    I hope you get a chance to work with Glitz Design Digital goodies!  I totally had the best time ever playing with all the possibilities!!

    Thanks for stopping by and I wish you a very Glitzy Day!!!
    Kristii