Showing posts with label Banner. Show all posts

Sunday, March 15, 2015

Make It Monday #204 - Watercolor Smooshing

Hi there dear friends!  It's Sunday night and I finally finished my Papertrey Ink Make It Monday Challenge - Watercolor Smooshing.  Here's my take on the Challenge:
I used Hibiscus Burst and Summer Sunrise Ink for the smooshing and I used a punch to punch out my butterflies from the smooshed paper.  What a fun technique and if you've never smooshed before check out Betsy's video for more!
 I used some PTI Banner Dies and printable paper from Melstampz to create the banner.
I die cut the PTI Block Alphas from PTI Silver Cardstock and Double Sided Foam Adhesive sheets and layered them onto PTI a Doily Details Die.
The florals were stamped using PTI Bitty Bouquet stamps and Dies.  These florals are my new favorite stamps and dies!! They are absolutely beautiful!!
I added a double layered border at the top of each of the banners using PTI Heart Border dies in Silver and Stamper's Select Cardstock.  
I added some little antennae to the butterflies using black cardstock and PTI Be Happy Dies.  I also added some rainstones to the butterflies for fun.
I tied the banners together using white Hug Snug Ribbon.
 I used my brand new MISTI to stamp all the flowers!  What an awesome tool!! If you haven't heard about the new MISTI tool, you are definitely missing out!! It is definitely the Most Incredible Stamp Tool Invented!
Thanks for stopping by!!!  I hope you have a wonderful week!!
Kristii

Monday, December 2, 2013

Twelve Days of Christmas: Day 2 Modern Whimsey Banner

Happy Day two of the Twelve Days of Christmas my friends!!  One of my goals this Christmas is to make a Christmas Banner for both of my girls and when I saw the MIM Challenge at Papertrey Ink, I was totally inspired!! I love Danielle Flander's style so much and you can just imagine how excited I was to case her style!!!  Whoo hooo!! I had a ball!!
Here's a close-up of the whimsical style:

I used several different Papertrey Ink sets for this fun little Banner.  I started with the Banner Dies and cut two sizes of banners - one in red and one in Stamper's Select White cardstock.
Then I die cut  a Rustic Wreath out of Stamper's Select White and stamped it in Simply Chartreuse Ink and colored it in with Copic Markers.  Notice I wasn't too worried about staying in the lines to keep in with the Modern Whimsey feel.  I die cut several Confetti Borders out and some I stamped and the heart border I die cut in PTI red patterned paper.  I die cut a pink snowflake and a vellum snowflake using the Fancy Flakes dies.  Way fun!!  Then I cut out the Christmas One Liners which I totally love!! So fun and fancy!!
 I was wishing I hadn't sold my Tremendous Treats set to embellish this banner, but I made do with what I had.  So I grabbed the cute PTI Penguin, The 2010 Holiday Tags Reindeer, and the cute little snowman from Friendship Jar Holiday Fillers.    Such an eclectic mix of goodies, but this year is all about using my scraps and I am enjoying the challenge!!

Holiday Banner
STAMPS: Rustic Wreath, Friendship Jar Holiday Fillers, Confetti Garland Borders, 201o Holiday Tags; Winter Penguin
INK: True Black, Pure Poppy, Berry Sorbet, Sweet Blush, Simply Chartreuse
PAPER: Pure Poppy Pattern Pack, Sweet Blush Cardstock, Stamper's Select, vellum
DIES: Fancy Flakes, Basic Banner, Rustic Wreath, Confetti Garland, One Liners; Winter Penguin

OTHER: Baker's twine

This Project also qualifies for the Wednesday Challenge over at Simon Says Stamp: Anything Goes!!
Thank you for Joining me on Day two of the Twelve Days of Christmas!
See you tomorrow for Day three!!
Kristii

Sunday, October 20, 2013

Make It Monday #136 Textured Stamping

Happy Sunday sweet friends!!  I have been enjoying spectacular color and cooler weather of these beautiful fall days and I trust that you have been too!  In celebration of Fall, I have made a fun little banner using the Papertrey Ink Make it Monday Challenge.  

Ashley challenged us to use a little creativity when inking our stamps to create texture and here is my take on the challenge and you can see the video here:
I swiped the stamp on the ink pad and created a rustic looking pumpkin and I totally love the texture and visual feel of the stamped image! What a fun way to add texture to your projects!!


 I started by die cutting some pennants using the Papertrey Ink Basic Banners Die Colection out of Rustic Cream Cardstock layered with patterned paper strips.  This technique was inspired by my favorite crafter Melissa Phillips on her Blog Lilybean Paperie!!  She is absolutely amazing!!
I took my little pennants and embellished them with a stamped tag using Think Big Favorites #19 and added some Leaves from the Autumn Acorns set and alphas from the Jillibean Soup  Corrugated Kraft Alphabet set.

I tied all the banners together with Jute twine and added some Melissa Frances Tissue Paper Garland.  Such a fun and festive little project and a great way to say Happy Fall!!

Supplies Used:
Papertrey Ink Basic Banner Dies
Papertrey Ink Think Big Favorites #19 Stamps
Papertrey Ink Autumn Acorns stamps and dies
Papertrey Ink Orange Zest, Simply Chartreuse, Summer Sunrise,  and Harvest Gold Inks
Tim Holtz Brushed Corduroy Distress Ink
Jillibean Soup Corrugated Kraft Alphas
Papertrey Ink Patterned Paper
Papertrey Ink Jute Twine

Thanks for stopping by and wishing you a happy Fall!!
Kristii

Saturday, December 1, 2012

It's the most wonderful time of the year!

Happy December 1st my friends!!  It's time to start the celebration and begin the 12 days of Christmas celebration!!
I have a fun little project for you today featuring Lisa Pace's Antiquated Line of Stamps, Sweet Little Girls.  These stamps are some of my all-time favorite stamps and I thought they would be oh so cute as little angels!  Stamp, Color, Cut, and add wings and glitter...What do you think?
I thought it would be fun to make these little beauties into a little banner to hang on my little heart peg shelf.  I made three panels and used three of the little girls stamps to make the angels.
I stamped around the edge of the star using Papertrey Ink's Love Lives Here: Holiday.  The little pine branches and hearts are a sweet little touch.
I used the McGill Pine Bough punch to make the greenery and added buttons and twine to add more color.
I used Papertrey Ink's Seeing Stars dies to die cut the stars that are in between the panels.  I just love the look of distressed cardboard stars!
Supplies used:
Lisa Pace's Antiquated Stamps by Pink Persimmon: Sweet Little Girls
Papertrey Ink Pure Poppy Patterned Paper, Rustic Cream Cardstock and Simply Chartreuse Cardstock
Papertrey Ink Love Lives Here Stamps
Papertrey Ink Seeing Stars Dies
McGill Pink Bough Punch
MemrieMare: Wings

Thanks for stopping by and I look forward to seeing you tomorrow for the second day of Christmas!!
Kristii

Saturday, June 23, 2012

Feeling Patriotic!!

Happy Saturday sweet friends!!  I just finished up with Farmer's Market this morning and we are on our way up to the mountains for a little hiking adventure!  I just love these sunny summer days!!! I'm in heaven I tell you.  This week I was feeling a little patriotic as I realized that the 4th of July is right around the corner.  I wanted to make a little banner to hang on my peg shelf and I remembered the sweetest little tag that Melissa Phillips created and thought it would make the start of a beautiful banner!! Thanks for the inspiration Melissa!!

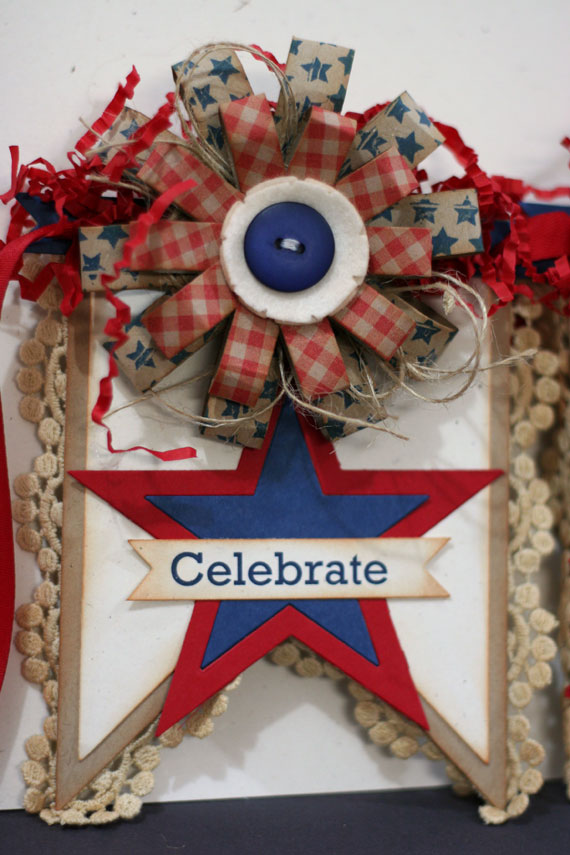
I used the Loopsy Daisy dies to make the bows. I stamped the stars onto kraft cardstock and printed the gingham pattern onto kraft cardstock from a template that I have saved on my computer.  Love, love, love the red, blue, cream and kraft combination! Thanks again Melissa for the inspiration!  I added some cream felt that was die cut with the notched flower dies.  I added some twine, a button and krinkled paper to each bow.  
 I attached the bows onto kraft and rustic cream layered pennants and embellished with lace.  I printed the Celebrate Freedom on my computer and notched the edges.  I die cut the stars with PTI's seeing stars dies.
I used my Cricut machine to cut God Bless America using the Stand and Salute Cartridge.
I just love the Loopsy Daisy bow!! It will be perfect for all types of banners!!  Here's a close-up of the bow!  So very Americana!!
This  little banner will hang on the pegs on my little shelf in my living room!! Perfect for the 4th of July celebration!!

Supplies Used:
Papertrey Ink Papers:  Rustic Cream, Enchanted Evening, Pure Poppy and Kraft
Papertrey Ink Stamps: est. 1776
Papertrey Ink Dies:  Loopsy Daisy, Boxy Banners, Seeing Stars, Notched Flower
Papertrey Ink:  Enchanted Evening and Pure Poppy
Papertrey Ink Felt:  Cream
Papertrey Ink Jute Twine
Cricut Machine and Stand and Salute Die
Prima Lace

Well, I hope that puts you in a patriotic mood!!!
Hope you have a most excellent Saturday!!
Kristii